The CJ3A Page CJ3B.info

Author Topic: The Jeep Heap - '49 CJ3a  (Read 21413 times)

0 Members and 1 Guest are viewing this topic.

Offline DaveW

  • Willys Fan
  • **
  • Posts: 76
  • Karma: +0/-0
  • Still Plays With Jeeps
    • View Profile
Re: The Jeep Heap - '49 CJ3a
« Reply #15 on: August 05, 2018, 01:12:27 PM »
My rebuild kit came in from Novak. Surprisingly the hardest part was getting all the needle bearings in the main cluster. Thankfully I did have some pieces of bar stock laying around to help with the process.

A couple of notes on the Novak kit.

The Good
- The kit appeared to use mostly USA made parts
- Switches to a sealed style front bearing to cut down on leaks
- Comes with decent (could be better with pictures) instructions

The Bad
- Was missing some parts, though a quick email to Novak had new ones on the way
- The plugs for the top cover popped out on first use, so I ordered NOS ones to replace them


Offline DaveW

  • Willys Fan
  • **
  • Posts: 76
  • Karma: +0/-0
  • Still Plays With Jeeps
    • View Profile
Re: The Jeep Heap - '49 CJ3a
« Reply #16 on: August 05, 2018, 01:21:08 PM »
Before putting the transmission back in, I did pull off the bell housing and fly wheel to replace the pilot bushing because it was lose and shot.

In my haste to get everything back together, I made the mistake of forgetting to put in the clutch fork and only realized it after I got the transmission in, the transfer case in, and most of the linkage re-connected.

I tried everything I could think of to wiggle it into place without pulled everything back apart. In my efforts, I managed to drop the fork down in the bell housing. Even after fishing around with a magnet for an hour, I couldn't manage to get it back out, so everything how to come back apart. Luckily, after pulling the transfer case, I was able to slide the transmission back a few inches and get the fork out and installed correctly.

After a week long blitz to get it all back together, I finally got it done by about 6pm on Friday. After a few forward and reverses out of the garage, I heard some clunking. Turns out I forgot to fully tighten the rear driveshaft, so it came apart at the pinion. Since I was determined to take it to ice cream that night, I searched the garage floor with a magnet to find all the needle bearings, cleaned them and got it back together in about an hour.

At about 7pm, we drove a few blocks to the local burger stand that's been around since 1948. I was thrilled that almost everyone there came over and started asking lots of questions about the jeep.


This was the after math on my garage floor.
« Last Edit: August 05, 2018, 01:31:49 PM by unclemoak »

Offline DaveW

  • Willys Fan
  • **
  • Posts: 76
  • Karma: +0/-0
  • Still Plays With Jeeps
    • View Profile
Re: The Jeep Heap - '49 CJ3a
« Reply #17 on: August 05, 2018, 01:26:09 PM »
Now that it was running, Saturday was a little more putting around town. I drove to the local farmers market in the morning, then to the parts store to pick up a new cap, rotor, and condenser.

I was hoping to make it a few more blocks to the gas station, but I managed to run out of gas at the local Jeep dealership.


Offline DaveW

  • Willys Fan
  • **
  • Posts: 76
  • Karma: +0/-0
  • Still Plays With Jeeps
    • View Profile
Re: The Jeep Heap - '49 CJ3a
« Reply #18 on: August 05, 2018, 01:30:09 PM »
Sunday offered some new adventures. While driving around town to shake out any more bugs that the Jeep had in store, I learned a few things, the 9" drums still suck and how to drive without brakes. While cruising around town, both front wheel cylinders failed.


Thankfully I was able to very gingerly limp it home on back streets.

Offline stony

  • Willys Guru
  • ****
  • Posts: 298
  • Karma: +0/-0
    • View Profile
Re: The Jeep Heap - '49 CJ3a
« Reply #19 on: August 05, 2018, 07:24:32 PM »
LOL been there.  Yeah fighting with my front wheel cylinders this afternoon.  They were rusted and frozen solid.  I was going to trash them, but since I HATE it when I can�t fix something I did manage to get them apart, cleaned up and honed bb smooth, ready for new seals.  Only took about 5 hours[ch128540]
Terry
1949 CJ3A 11159 body 11225 engine 11140
On preservation vs. restoration:Roscoe Lee Brown "the Cowboys" when he met the whores on the trail:"Well, I have the inclination, but not the time”.

Offline athawk11

  • SMF Administrator
  • Flatfender Master
  • *****
  • Posts: 2818
  • Karma: +0/-1
  • 1949 CJ3A
    • View Profile
Re: The Jeep Heap - '49 CJ3a
« Reply #20 on: August 05, 2018, 08:44:27 PM »
I will offer a cautionary tale to Stony and Dave.� I tried to hone and rebuild my wheel cylinders.� The honing went quite well.� Purchased the rebuild kits from NAPA.� Within a few months I lost the first rebuilt wheel cylinder.� Replaced it with a new one.� Within a year, I lost the second rebuilt cylinder.� Replaced the remaining 3 with new cylinders.� I can't say whether rebuilt cylinders will fail or not.� Mine failed.� And it ruined the paint on my wheels.� In 7 years, I haven't lost any of the replacement cylinders.

Edit:  I wish I had a cool old ice cream stand in my area.  Looks like you had a lot of fun.
« Last Edit: August 05, 2018, 08:46:07 PM by athawk11 »
2-1949 CJ3As
1-1946 CJ2A

Offline DaveW

  • Willys Fan
  • **
  • Posts: 76
  • Karma: +0/-0
  • Still Plays With Jeeps
    • View Profile
Re: The Jeep Heap - '49 CJ3a
« Reply #21 on: August 05, 2018, 09:24:41 PM »
Quote
I will offer a cautionary tale to Stony and Dave.� I tried to hone and rebuild my wheel cylinders.� The honing went quite well.� Purchased the rebuild kits from NAPA.� Within a few months I lost the first rebuilt wheel cylinder.� Replaced it with a new one.� Within a year, I lost the second rebuilt cylinder.� Replaced the remaining 3 with new cylinders.� I can't say whether rebuilt cylinders will fail or not.� Mine failed.� And it ruined the paint on my wheels.� In 7 years, I haven't lost any of the replacement cylinders.

Edit:� I wish I had a cool old ice cream stand in my area.� Looks like you had a lot of fun.

Thanks for the heads up. Since the brakes went out, it pains me to put money into the anemic 9", so I'm thinking it might be time to just update them and be done with it.

Offline squidtone

  • Willys Guru
  • ****
  • Posts: 348
  • Karma: +0/-0
  • Still Plays With Jeeps
    • View Profile
Re: The Jeep Heap - '49 CJ3a
« Reply #22 on: August 05, 2018, 09:55:40 PM »
It's great to see your ol' Jeep tooling around town. I wish I could have enjoyed mine this way (loads of patina) but it was too far gone to be safe.
Enjoy it and the attention from folks who've never seen an old flatfender!
Dave Miles
Presently: � � � � � � � �
03 Rubicon,
50 CJ3A
Past:
01 XJ Cherokee,
87 XJ Cherokee,
85 XJ Cherokee,
83 CJ8,
81 CJ7

Offline stony

  • Willys Guru
  • ****
  • Posts: 298
  • Karma: +0/-0
    • View Profile
Re: The Jeep Heap - '49 CJ3a
« Reply #23 on: August 05, 2018, 10:04:42 PM »
Quote
I will offer a cautionary tale to Stony and Dave.� I tried to hone and rebuild my wheel cylinders.� The honing went quite well.� Purchased the rebuild kits from NAPA.� Within a few months I lost the first rebuilt wheel cylinder.� Replaced it with a new one.� Within a year, I lost the second rebuilt cylinder.�

Thanks I will keep that in mind, still think I�ll try rebuilding them.  The master cylinder however is aluminum aftermarket, so that is going to need to be replaced.
Terry
1949 CJ3A 11159 body 11225 engine 11140
On preservation vs. restoration:Roscoe Lee Brown "the Cowboys" when he met the whores on the trail:"Well, I have the inclination, but not the time”.

Offline DaveW

  • Willys Fan
  • **
  • Posts: 76
  • Karma: +0/-0
  • Still Plays With Jeeps
    • View Profile
Re: The Jeep Heap - '49 CJ3a
« Reply #24 on: August 06, 2018, 01:41:56 PM »
After some diliberation on what to do about the brakes, I decided to swap to Geo Tracker/ Suzuki Sidekick brakes using brackets from Brennan Metcalf.

The reason I chose this route from other options came down to price and not having to modify the existing axles or knuckles. I had lots of questions for Brennan and the conversion, some of which he was able to answer and some he wasn't. My engineering brain wanted a certain level of detail and knowing what I'm getting myself into with the swap, but it looks like there will be some ambiguity with the soft lines and how the connect to the calipers and hard lines as well as what style of wheels actually work with the conversion.

These are the style of 15" wheel I have on the Jeep currently that appear to have come off a later 70s CJ. There is some conflicting information out there, some say they will work, other say they won't. For my sake, I hope they do, because I don't want to have to buy a whole other set of wheels and tires.


Some details on the swap and the parts used.

Calipers, rotors, and pads come from and early to mid 90s 2 door (four door uses different parts) Geo Tracker or Suzuki Side Kick.

The soft brake lines I've heard can come from a variety of sources, but it seems that front soft lines off of a early to mid 90s Chevy S10 work the best. I wanted to keep the brake system as stock as possible and use as much as I could of what was there.

The brackets and spacers come from Brennan Metcalf.

In total, I have about $450 into the swap which is peanuts compared to some of the other kits that are out there.

While I waited for the parts and brackets to come in, I got busy stripping down the wheel ends to accept the conversion.


Offline DaveW

  • Willys Fan
  • **
  • Posts: 76
  • Karma: +0/-0
  • Still Plays With Jeeps
    • View Profile
Re: The Jeep Heap - '49 CJ3a
« Reply #25 on: August 06, 2018, 01:44:15 PM »
In the mean time, I have a few smaller projects to take care of.

First is removing this bypass line.


The other quick hitter was getting a working temp gauge installed.

Offline DaveW

  • Willys Fan
  • **
  • Posts: 76
  • Karma: +0/-0
  • Still Plays With Jeeps
    • View Profile
Re: The Jeep Heap - '49 CJ3a
« Reply #26 on: August 06, 2018, 10:46:57 PM »
As I progress through the disk brake install, I'll try to give some feedback and reasoning to parts and methods I used.


Parts list:

Brackets and spacers - from Brennan Metcalf
Calipers - BECK/ARNLEY      0770705S / 0770706S (you'll need rights and lefts)
rotors - DURAGO      BR3222
pads - CENTRIC      30104180
studs - RAYBESTOS      0528B
hoses - CENTRIC      15066055
Caliper bolts - M12-1.25x30mm and washers (I might swap these out for flange bolts later on)

Calipers, rotors, pads are off a 1995 Suzuki Sidekick 2 door (four door uses different parts)

Hoses are off a 1995 Chevy S10 Front 2wd

studs - no idea, just search the PN

There are a few options out there for studs, the reason I chose the ones I did because they have a shorter knurled section than the factory studs (factory studs have to go through the hub AND the drum).

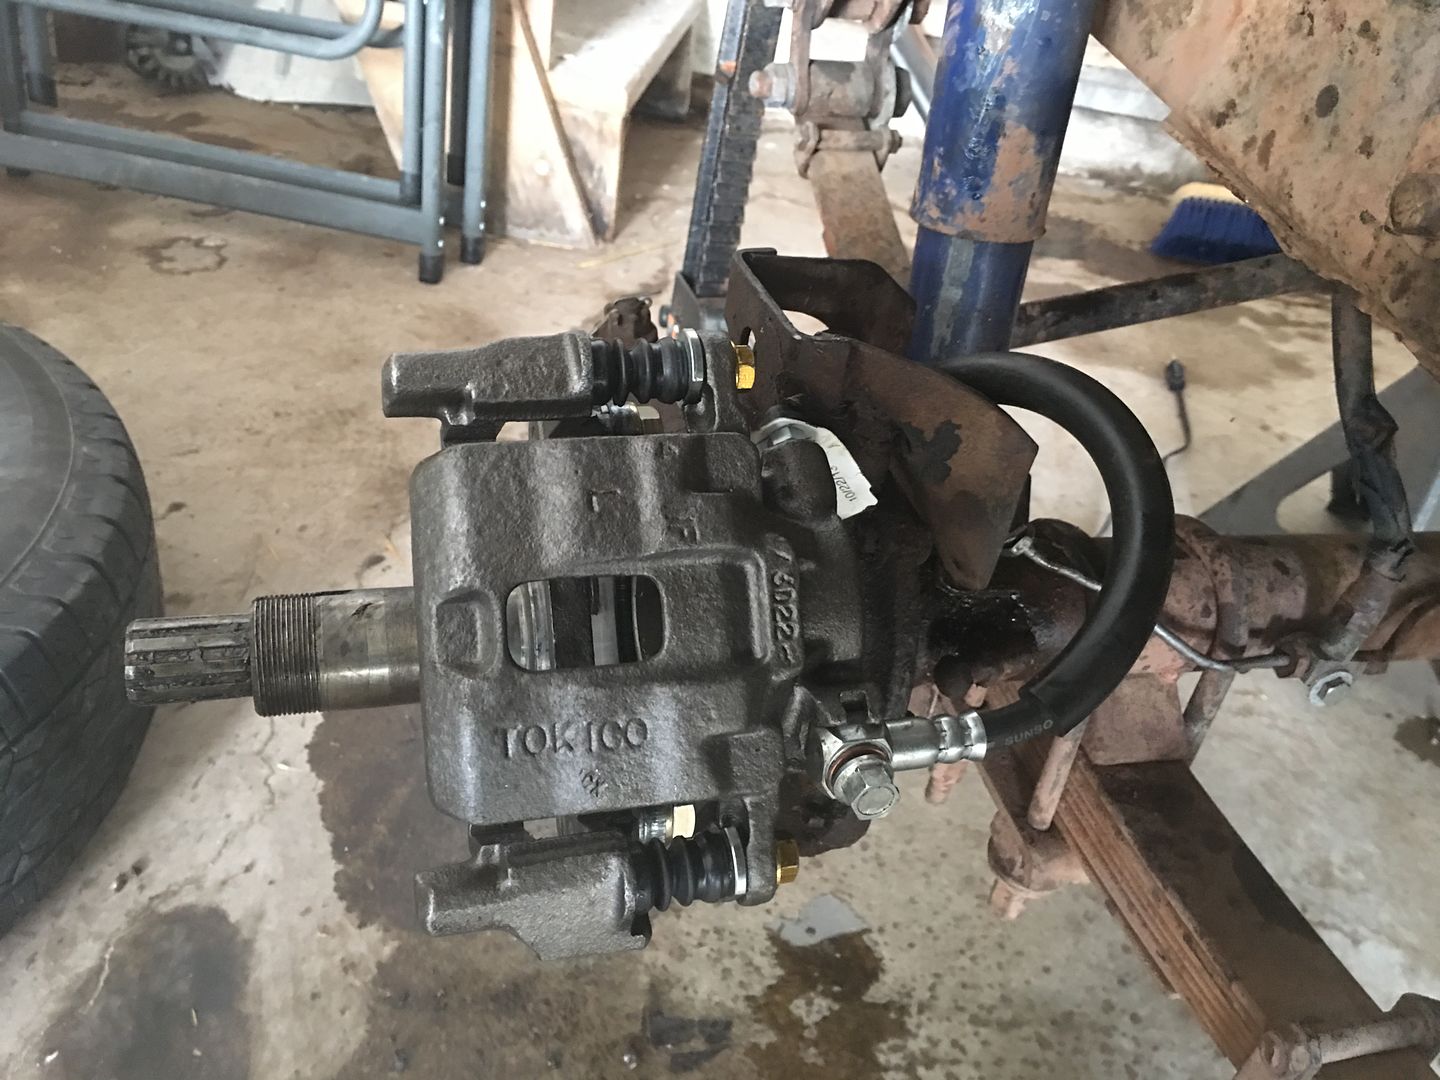
Likewise for the brake hoses. There are a few options and lengths out there, some people even seem to opt for having customer hoses made. I prefer to use off the shelf parts for ease of replacement. The banjo end of the hose will bolt directly to the caliper (the calipers I bought came with a 10mm banjo bolt, copper washers, brackets, and clips to retain the pads). I did use the same S10 brake hose on all four corners.

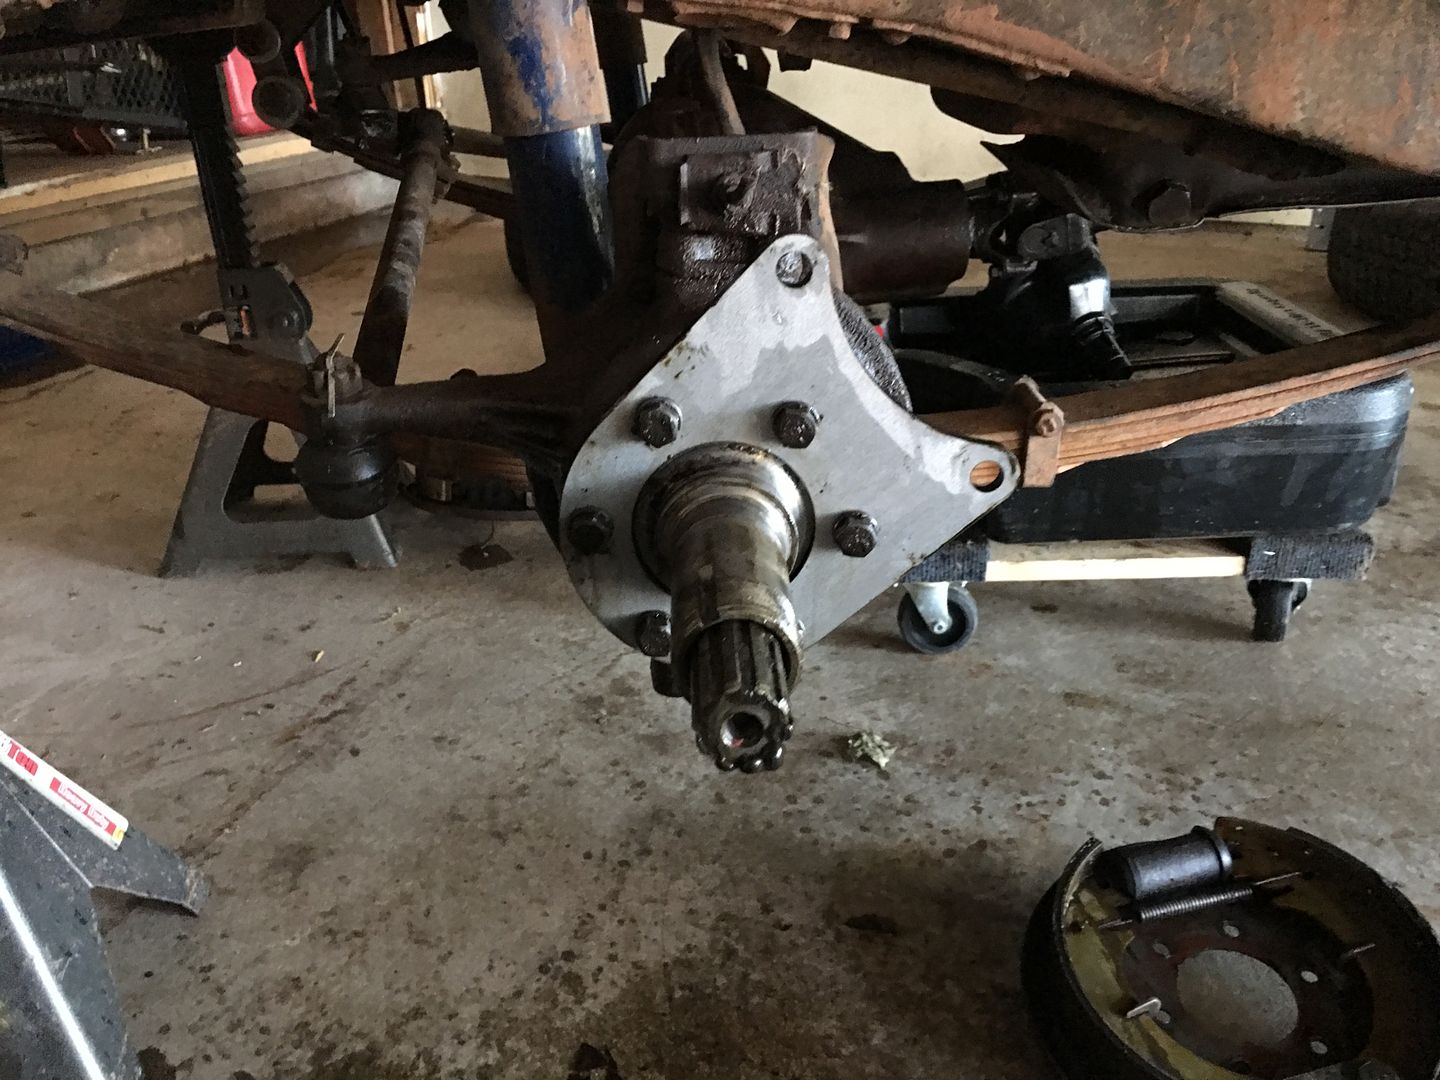
The bracket installation is pretty straight forward. I clocked mine as show for ease of routing the brake hoses, but more on that later. The spindle bolts between the bracket and the knuckle. The bolts in my knuckle were long enough to get more than a few turns of engagement. If you're don't get at least three threads of engagement, get longer bolts.

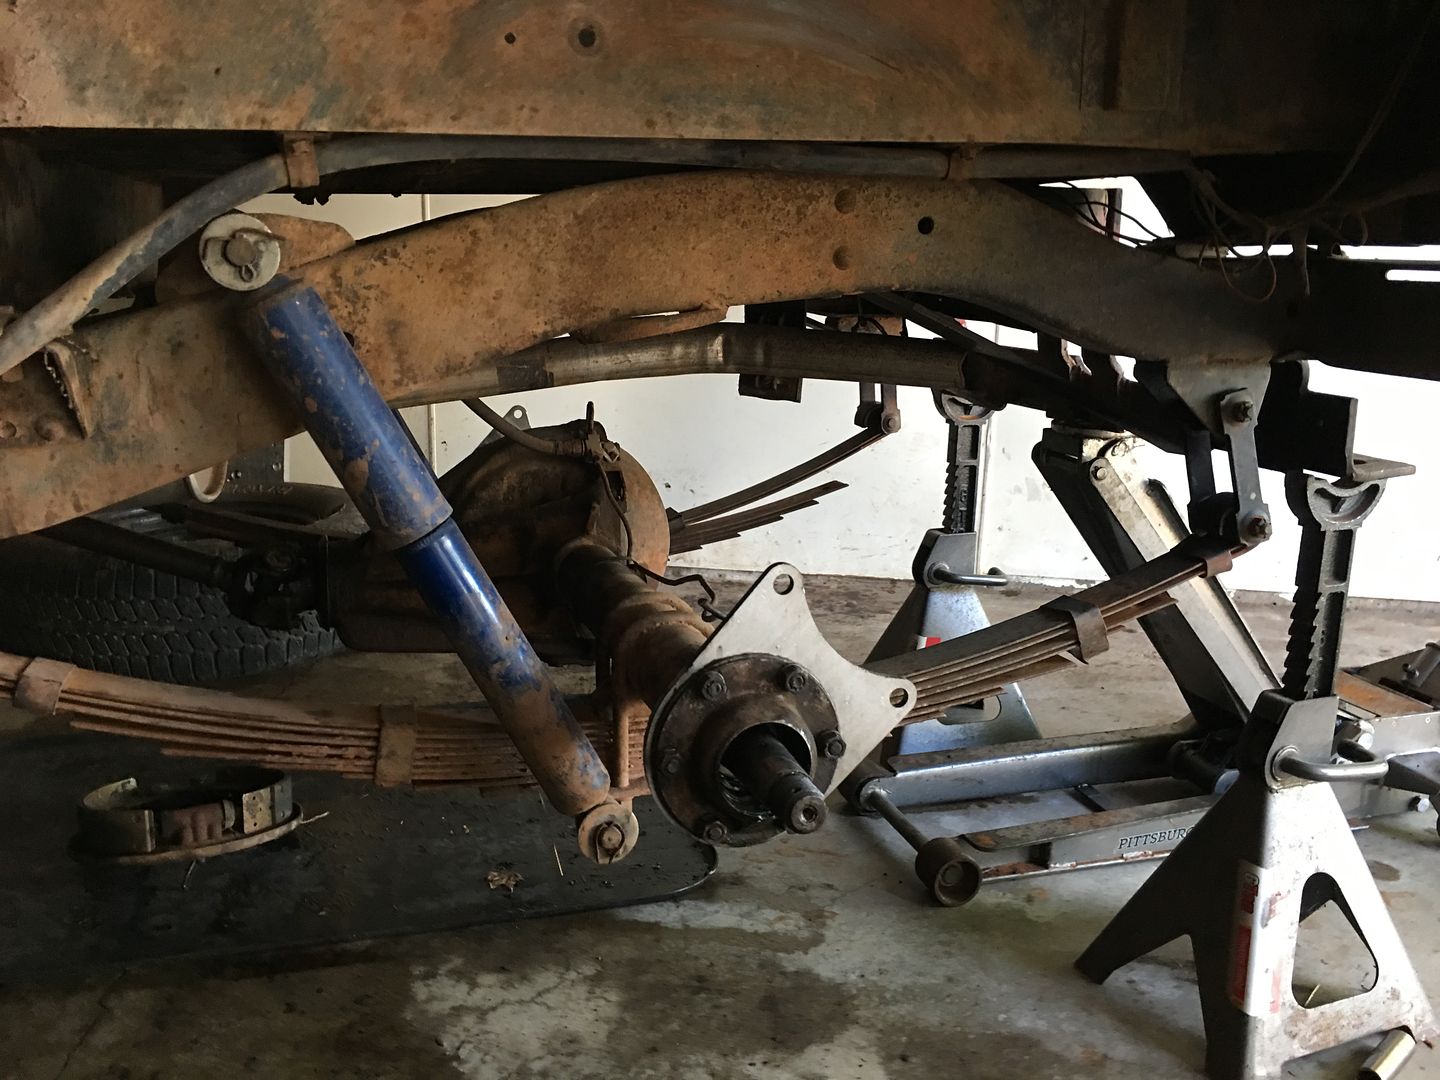
The rear brackets mount much the same way. I also chose to clock mine toward the rear because the hard brake lines on my rear axle were on the back side of the axle. With these, you need to position the shims, bearing retainer, then the bracket, then outer oil seal last. If you don't do it in this order, you will have alignment issues.


I didn't take any pictures of pressing the studs out of the drums and rotors. The fronts were fairly easy with a hydraulic press. The rears were a different story because of bring crimped/swaged. I ended up mounting the rears in my milling machine to cut the heads off the studs and pounding them out with a sledge hammer. Word to the wise, wear ear muffs as it gets loud banging on them.

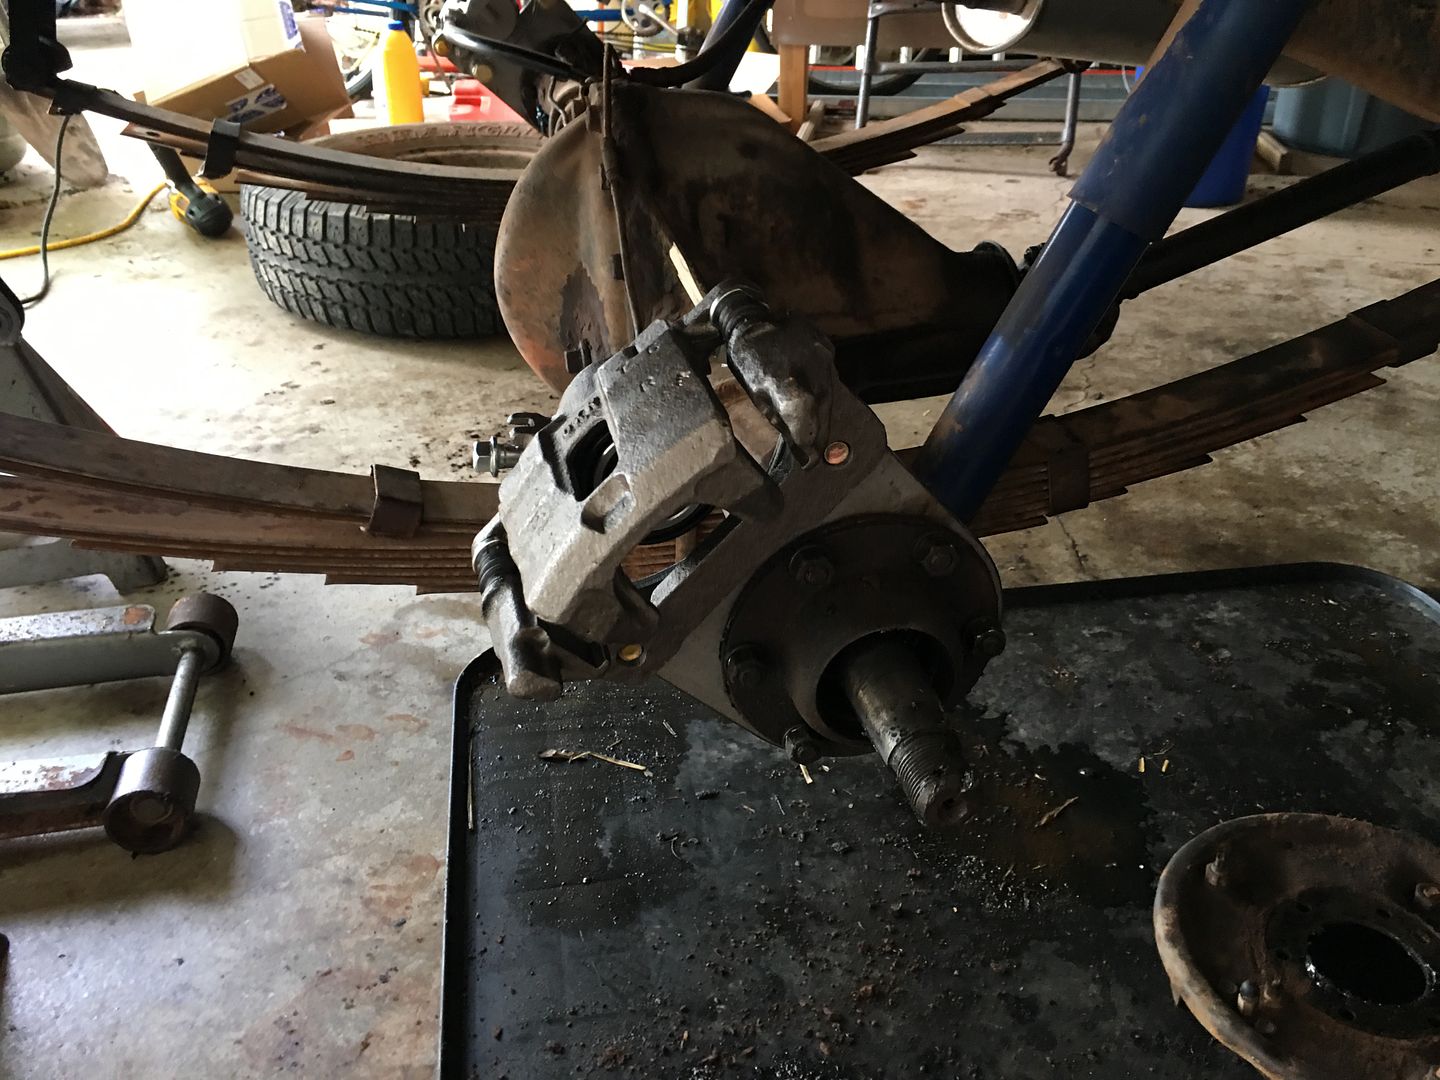
This is how the bracket and spacer get oriented. The caliper mount bracket goes outboard of all that. It's important to note that when installing and orienting the calipers, that the bleeder needs to be the highest point on the caliper, otherwise it will be darn near impossible to bleed.



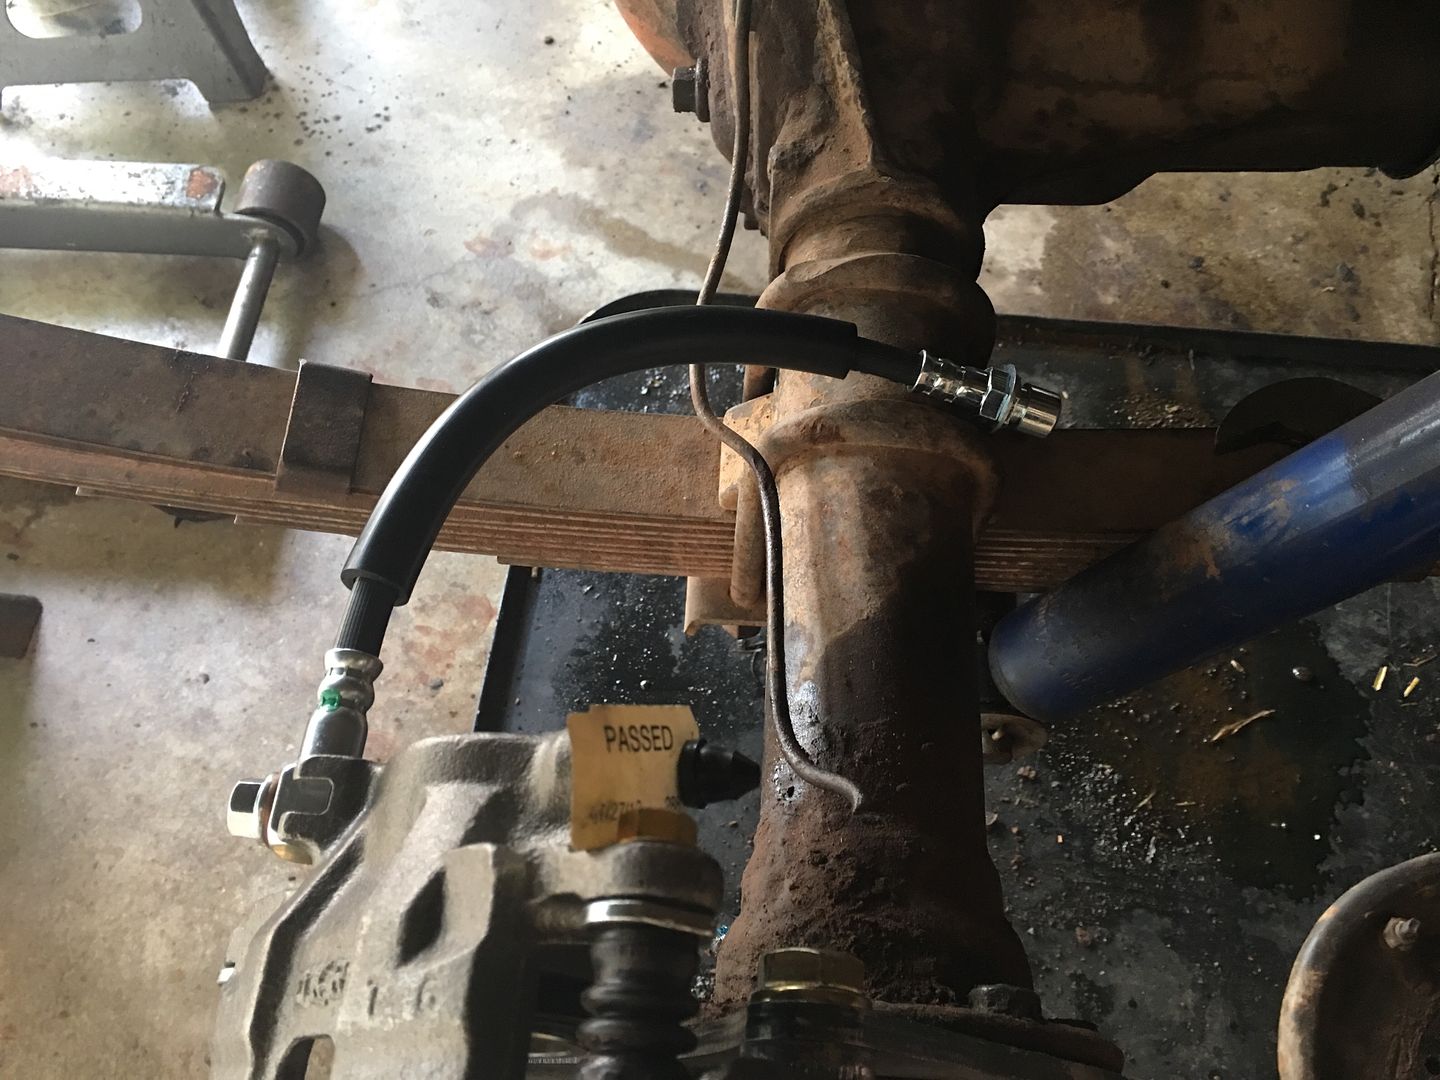
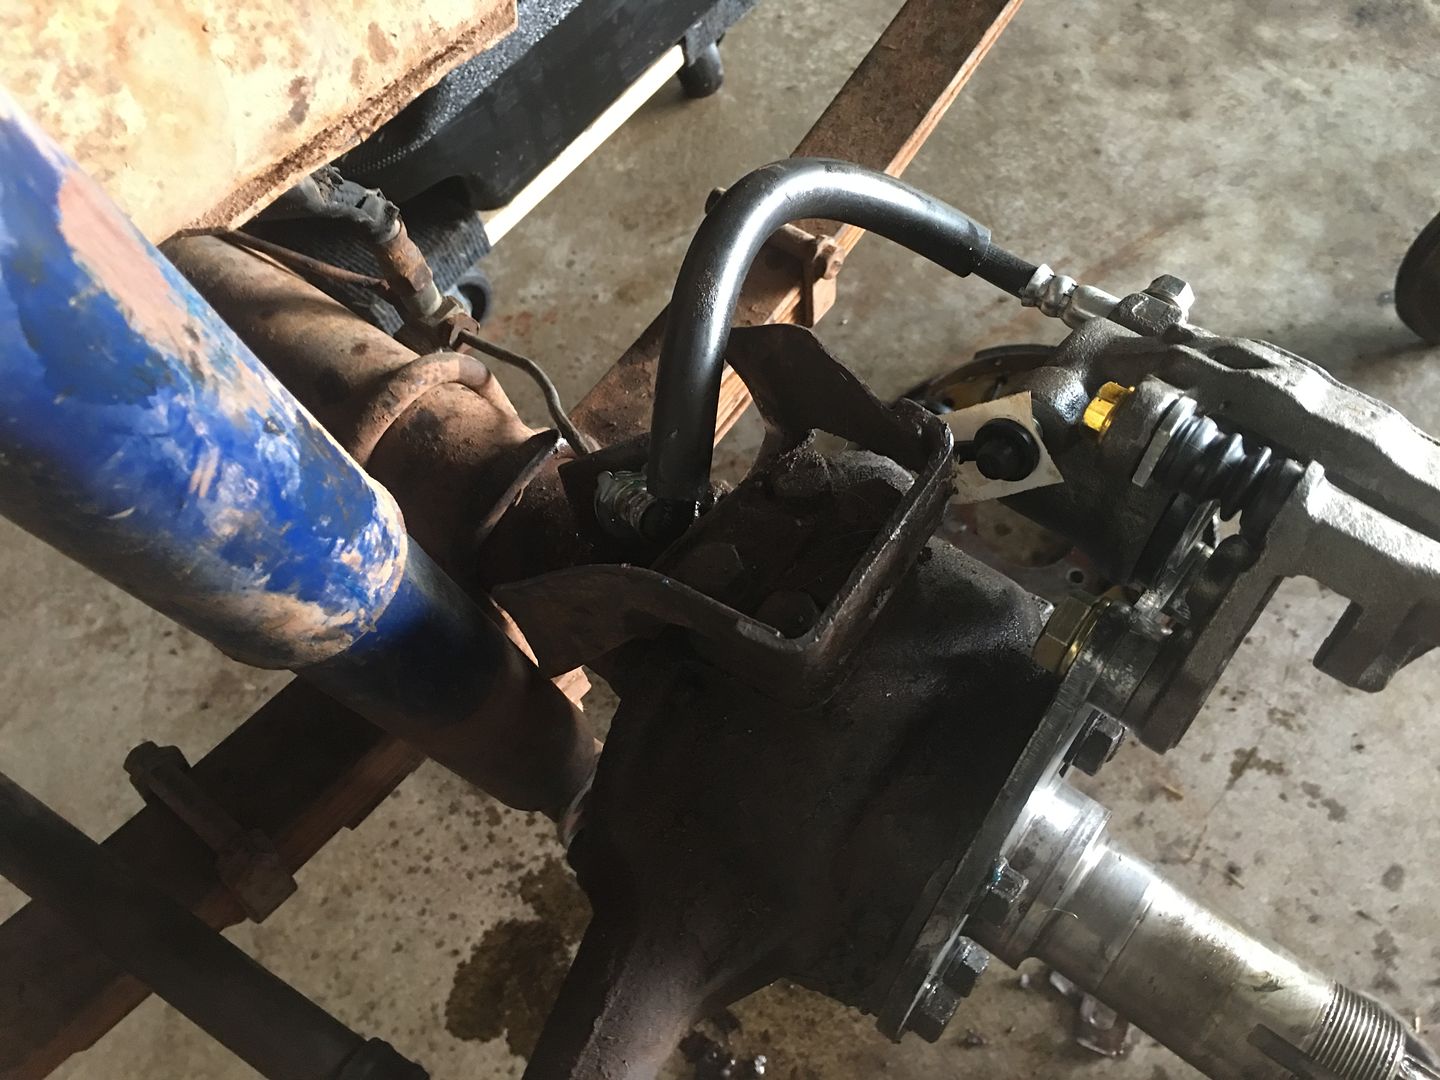
With the brake hose installed, you can visualize how I intended to connect my hard lines. I'll make a little bracket that attaches to the axle between the u-bolts so it's out of the way. Really the only modification that needs to be made to the re-used portion of the existing brake system is right here at the hard line on the rear axle. The hard line needs to be shortened and re-flared. That's it.

The fronts go together in a similar manner.
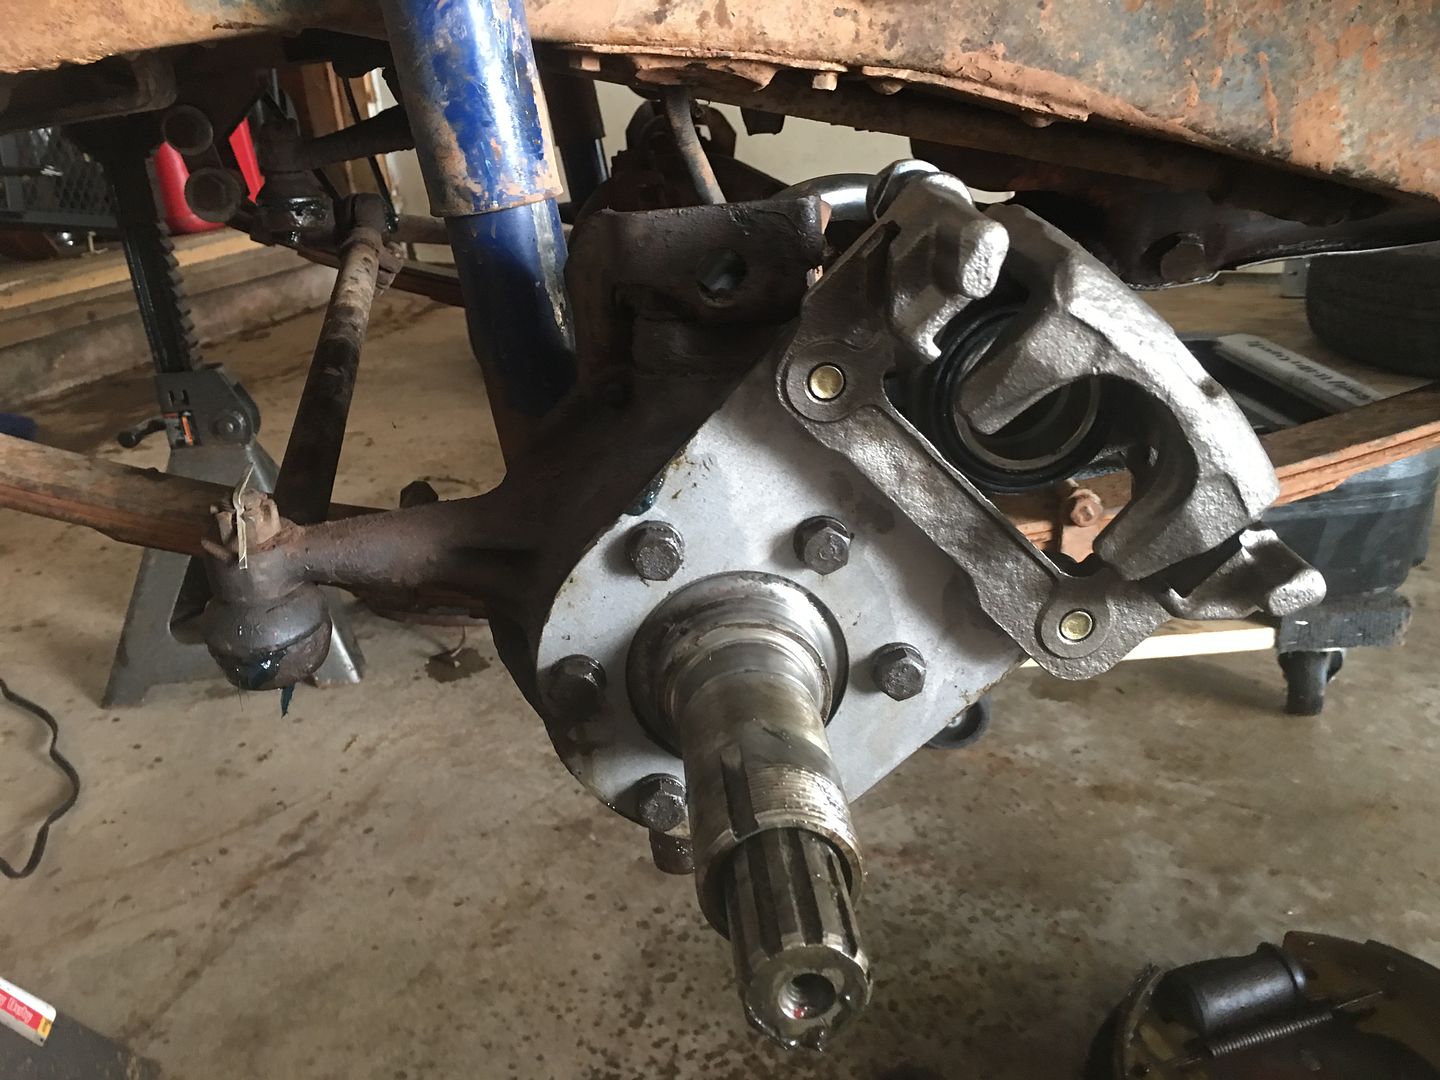

This shot highlights why I chose to use the S10 lines. It has plenty of length to use the existing bracket AND will mate to the factory hard line.


I did opt to order new lug nuts since I was replacing all the studs and mine were a horrible mix of right and left hand thread and different size hex's. One quick note on installing new studs. There are other stud recommendations out there, but the ones I referenced above seem to be the best because they have a shorter knurl on them. If you don't opt to use new studs with the shorter knurl, you will have to drill out the back side of the rotor line Gunslinger had to do in his thread - http://www.cj3apage.com/cgi-bin/3Ayabb26/YaBB.pl?num=1523122427/2


The final step was putting it all together.


Offline DaveW

  • Willys Fan
  • **
  • Posts: 76
  • Karma: +0/-0
  • Still Plays With Jeeps
    • View Profile
Re: The Jeep Heap - '49 CJ3a
« Reply #27 on: August 06, 2018, 10:55:44 PM »
Turns out I hit the 5500 character limit on that last post, so part 2.....

The one other point of confusion with this whole upgrade was what wheels would actually fit. If you remember back to the 15" later CJ wheels I had, there was mixed messages over what would fit and what wouldn't. Well it turns out they didn't fit. They didn't clear the calipers and hit right where the inner sections mates with the outer.


I managed to find a set of wheels local to me. Unfortunately I didn't inspect them close enough before getting home because I soon learned that out of four wheels, I had three different styles, but it ended up being a mixed blessing because I can now share what wheels do and don't work.


These are early style 16" Kelsey Hayes wheels. Please note the flat lug nut flange area. These wheels WILL WORK.


These are later style 16" Kelsey Hayes wheels. Please note the flat lug nut flange area and the step in the spoke. These wheels WILL WORK.


The third style I had was a 16" MotorWheel. Note the bumps in the lug nut area and the lug nut flange is distinctly different. These wheels WILL NOT WORK.


So now came the challenge of finding a complete set of 5 wheels AND having to buy new tires.

Offline DaveW

  • Willys Fan
  • **
  • Posts: 76
  • Karma: +0/-0
  • Still Plays With Jeeps
    • View Profile
Re: The Jeep Heap - '49 CJ3a
« Reply #28 on: August 15, 2018, 01:17:50 PM »
While searching for some wheels, I did a bit more work on the brake system and ordered some new hoses and tees.

When they arrived I didn't think the tee was quite right because of the flare within the top port of the tee. After a call to Ron Fitzpatrick, I was assured that they were correct and a copper washer was used to seal the connection.


In my opinion this should be a flared connection on the tee to match the flared connection on the hose.


Similar to what is on the sides.


End of the hose that goes to the hardline at the frame.

Offline DaveW

  • Willys Fan
  • **
  • Posts: 76
  • Karma: +0/-0
  • Still Plays With Jeeps
    • View Profile
Re: The Jeep Heap - '49 CJ3a
« Reply #29 on: August 15, 2018, 01:22:01 PM »
Took receipt of a few winch parts. An original roller fairlead, a pto case to configure mine correctly and a Ramsey 246R. A 200R would have been more correct, but I got a fair deal on this, though it needs minor repairs. I have a machine shop, so the repairs are easy enough.


Part of the PTO case to change my pto into a PT1-J. The plug is stuck in there and will need drilled out.


Other repairs needed to the case. I think with a copper backing plate and some 4043 filler rod, I can get it repaired with a TIG welder.


Fairlead.