The CJ3A Page CJ3B.info

Author Topic: Hawk...CJ3A 36662  (Read 13873 times)

0 Members and 1 Guest are viewing this topic.

Offline SteveKfl

  • Flatfender Enthusiast
  • ***
  • Posts: 106
  • Karma: +3/-0
    • View Profile
Re: Hawk...1949 CJ3A
« Reply #15 on: January 18, 2020, 07:34:08 AM »
It seems to be shaping up nicely.  I too went to the school of "Burn to Learn", and found even the weather made a difference for me.  Of course, "after" I was done, someone suggested placing aluminum behind the surface, if possible, to take out some of the heat, but I've never tried it yet.  Has anyone else heard of and/or tried that tip?  Thanks for keeping the story going.  It goes well with my coffee every morning.
My Concept Roadster
62 DJ3A Dispatcher Half Top

Offline OnlyOneDR

  • Project Jeep (Newbie)
  • *
  • Posts: 13
  • Karma: +1/-0
  • Just Started Playing With Jeeps
    • View Profile
Re: Hawk...1949 CJ3A
« Reply #16 on: January 18, 2020, 02:43:46 PM »
...someone suggested placing aluminum behind the surface, if possible, to take out some of the heat, but I've never tried it yet.  Has anyone else heard of and/or tried that tip?

Use copper or bronze or brass as a backing material.  I use brass strip clamped in behind the joint.  It doesn't stick to steel and the melting temperature is much higher than aluminum so it will not melt as easily if you set your welder too high.
Searching for time to put it all together...
1950 CJ-3A #37751 In Pieces
1969 Chevy Blazer Resto-Mod Waiting for its day...
2001 Nissan Frontier Crawler Adventure Rig

Offline 64CJ5

  • Willys Fan
  • **
  • Posts: 76
  • Karma: +0/-0
    • View Profile
Re: Hawk...1949 CJ3A
« Reply #17 on: January 20, 2020, 09:02:02 PM »
I flattened 1" hard copper tubing and bent a right angle on it.  The copper works good to keep from burning through if the heat is too high.  Trial and error welding.
The sun never sets on the mighty Jeep.

Offline athawk11

  • SMF Administrator
  • Flatfender Master
  • *****
  • Posts: 2818
  • Karma: +0/-1
  • 1949 CJ3A
    • View Profile
Re: Hawk...1949 CJ3A
« Reply #18 on: January 21, 2020, 01:25:08 PM »
Excellent suggestions Gentlemen.  I too learned that backing up my welds with copper really helped.  Particularly while filling in the multiple drilled holes we all come across.


The patchwork welding on the side walls was going well.  I did have to learn how to 'shrink' metal...


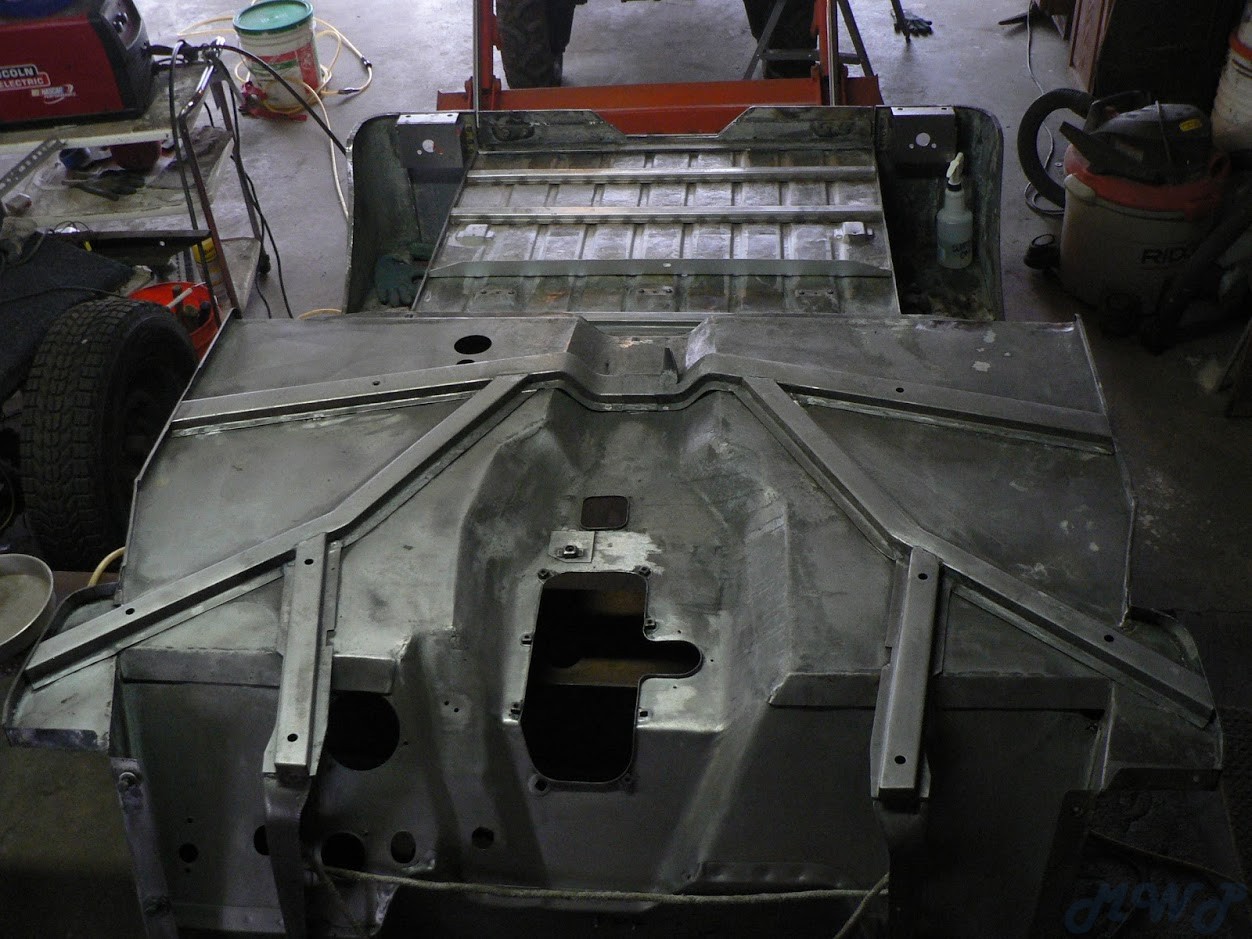
There were glaring problems with the floors and the hat channels.  I just didn't think I was going to be able to make the thing look nice without addressing them.  I couldn't figure out how to fix them without removing the tub.  I thought about it for a while, then came up with this...


After pulling the tub, I got a good look at the damage.  I purchased the front floor pans and hat channel kits from one of the vendors and started hacking away at them...


On to the cargo area. 

The metal was pretty pitted and sagged horribly.  I couldn't afford a new cargo floor, so I removed the damaged cargo hat channels, made a dolly that fit the ribs and started 'working' them back in to shape.  It had clearly lost some strength, so I installed extra hat channels and supports on the underside.  It turned out nice.   This took hours and hours of effort.  It saved me some cash and was a good learning experience.


I did have to fix my toolbox walls and a bunch of repairs to the fenders, but I didn't take photos.  With regard to welding, I was pretty close to finished.  There was just one more thing...


2-1949 CJ3As
1-1946 CJ2A

Offline athawk11

  • SMF Administrator
  • Flatfender Master
  • *****
  • Posts: 2818
  • Karma: +0/-1
  • 1949 CJ3A
    • View Profile
Re: Hawk...1949 CJ3A
« Reply #19 on: January 23, 2020, 01:43:29 PM »
I wanted to add tool indents.  With the help of a drawing created by Jpet (Jeff Petrovich) at the 2A Page, I started to hack away at the tub.  I made the indents first, then cut the matching dimensions from the side of my tub.  I was fighting the natural tendency of sheet metal to warp when it's welded.   I got it all back together but not without a fight.  My mistake was cutting both slots out of the tub before welding the indents in place.

If you ever want try this, I recommend you cut just one of the indent slots at a time.


This is my wife Rachel.  She was showing me some tricks.


I wasn't confident enough in my skills to do this stuff, so I got into the good habit of test fitting everything I modified.  You'll notice the seats are also in place.  These are 2A seats that came with this 3A.  Many of you know the complication that creates.  More on that later.


« Last Edit: January 23, 2020, 01:52:49 PM by athawk11 »
2-1949 CJ3As
1-1946 CJ2A

Offline Oilleaker1

  • Willys Guru
  • ****
  • Posts: 201
  • Karma: +1/-0
  • Automotive Archeology/ Jeep Disease, Green Diseas
    • View Profile
Re: Hawk...1949 CJ3A
« Reply #20 on: January 24, 2020, 06:36:42 AM »
Hawky, when you get into it, you go all the way. Love your style. You also can do just about anything you put your mind to. I appreciate that. Oilly

Offline athawk11

  • SMF Administrator
  • Flatfender Master
  • *****
  • Posts: 2818
  • Karma: +0/-1
  • 1949 CJ3A
    • View Profile
Re: Hawk...1949 CJ3A
« Reply #21 on: January 24, 2020, 11:06:46 AM »
Thanks Oily!

It's not too bad for my first attempt, but it pales in comparison to your stuff.   :)
2-1949 CJ3As
1-1946 CJ2A

Offline athawk11

  • SMF Administrator
  • Flatfender Master
  • *****
  • Posts: 2818
  • Karma: +0/-1
  • 1949 CJ3A
    • View Profile
Re: Hawk...1949 CJ3A
« Reply #22 on: January 29, 2020, 12:27:37 PM »
I had pretty much wrapped up the repair patches and welding.  There would be some additional things that needed these types of repairs and mods. There were even some additional mods to consider, like a glovebox or removeable gauge cluster mounting plate.
 
Pulling the tub exposed just how filthy the frame and drivetrain were. I had that "Lipstick on a Pig"/ "Uh-Oh, better get Maco" paint job moment.  Just cleaning up the top side wasn't going work for me...


Initially I was terrified to take this apart and then not being able to put it back together.  I started to clean and scrub away the crud...


Not too far into this effort, I realized I would never be able to get it clean enough to do a simple paint job without pulling off some of the pieces.  I pulled a few, then a few more. I bagged and marked the nuts, bolts and screws.    I took lots of pictures along the way, in hope that I could refer to them when the time came to put it back together.


I didn't work in any obvious way... because nothing was obvious to me.  This was all new.  It was some kind of nightmare I couldn't wake up from.


I eventually pushed passed my fears and started getting stuff done.
 

« Last Edit: January 29, 2020, 12:30:58 PM by athawk11 »
2-1949 CJ3As
1-1946 CJ2A

Offline squidtone

  • Willys Guru
  • ****
  • Posts: 348
  • Karma: +0/-0
  • Still Plays With Jeeps
    • View Profile
Re: Hawk...1949 CJ3A
« Reply #23 on: January 29, 2020, 08:31:02 PM »
Ahhhhhh,
A "fixin' up a Jeep" fix.
I have tool indent envy.
Thanks Hawk
Dave Miles
Presently: � � � � � � � �
03 Rubicon,
50 CJ3A
Past:
01 XJ Cherokee,
87 XJ Cherokee,
85 XJ Cherokee,
83 CJ8,
81 CJ7

Offline athawk11

  • SMF Administrator
  • Flatfender Master
  • *****
  • Posts: 2818
  • Karma: +0/-1
  • 1949 CJ3A
    • View Profile
Re: Hawk...1949 CJ3A
« Reply #24 on: February 05, 2020, 01:10:37 PM »
The disassembly continued.  Because of my lack of knowledge, I would occasionally pull stuff apart, then immediately put it back together.  I wanted to make sure I learned how to do it.

This was the first engine I ever pulled.  That was a big day.


It's a G.P.W. version of the L-134.  At the time, I didn't understand why, but there were a few folks that wanted this engine.


All in all, there is nothing particularly interesting about it.  The only stamping is shown below and it didn't mean anything to the experts.


After a little research I figured that it was probably just a surplus engine sold off by Ford following the end of WWII.  It likely sat on a shelf at an auto supply house for quite some time before ending up in this 3A.  I found out later that it still has the standard size pistons and crankshaft journals, so it's probably not been through a rebuild.


It ran pretty nice (though I had nothing to compare it to) so my plan was to clean it, replace gaskets and paint it.
« Last Edit: February 05, 2020, 01:13:39 PM by athawk11 »
2-1949 CJ3As
1-1946 CJ2A

Offline athawk11

  • SMF Administrator
  • Flatfender Master
  • *****
  • Posts: 2818
  • Karma: +0/-1
  • 1949 CJ3A
    • View Profile
Re: Hawk...1949 CJ3A
« Reply #25 on: February 10, 2020, 12:25:38 PM »
I bought a cheap sand blaster from Harbor Freight that worked surprisingly well removing rust on lots of parts, the frame and axles.  After sandblasting and some welding repairs on the frame, I  set the tub, grille, fenders and axles one last time before painting.


I decided to use the MasterSeries Silver anti-rust primer as my base.  It has several desirable qualities.  After this layer, I primed the parts with Red Oxide, then finally Gilespie's 23070 Semi-Gloss OD paint. 


I continued to clean and paint the bits and pieces...


Time to reassemble the chassis...


2-1949 CJ3As
1-1946 CJ2A

Offline athawk11

  • SMF Administrator
  • Flatfender Master
  • *****
  • Posts: 2818
  • Karma: +0/-1
  • 1949 CJ3A
    • View Profile
Re: Hawk...1949 CJ3A
« Reply #26 on: February 11, 2020, 08:11:24 AM »
There was one engine modification I needed to address before the chassis could be put back together.  This engine was equipped with this special part that allowed the 2A/MB/G.P.W.  style engine to be installed on a 3A frame.


I didn't want to re-use it, so I decided to change the front engine plate to a 3A style.  There is no option for a 3A style front plate that is compatible with a chain drive motor.  This created a small problem...


I simply welded the gap shut on this 3A plate.  There were other minor changes required to the plate, but nothing a grinder couldn't solve.
« Last Edit: February 11, 2020, 08:14:54 AM by athawk11 »
2-1949 CJ3As
1-1946 CJ2A

Offline athawk11

  • SMF Administrator
  • Flatfender Master
  • *****
  • Posts: 2818
  • Karma: +0/-1
  • 1949 CJ3A
    • View Profile
Re: Hawk...CJ3A 36662
« Reply #27 on: February 13, 2020, 01:16:51 PM »
Just some detailed chassis shots...


Cleaned, flushed and painted the bottom mount radiator.


Kind of a unique radiator cap.  It looks like an original cap but with an added lever pin.  Unfortunately, the seal gave out on this only months later.  I couldn't find a replacement seal.


Got the 7.00 x 15" NDCCs mounted, balanced, installed.


Chassis start up day.   Added fluids and basic ignition circuit wiring only.  The engine fired right up.

I didn't do it on this project, but at this stage I generally recommend running the chassis around the neighborhood for a few trips before installing the tub.


Overall, the chassis assembly was a success.  I learned a lot.  I cursed a lot.  I bled a lot.
« Last Edit: February 13, 2020, 01:27:47 PM by athawk11 »
2-1949 CJ3As
1-1946 CJ2A

Offline SteveKfl

  • Flatfender Enthusiast
  • ***
  • Posts: 106
  • Karma: +3/-0
    • View Profile
Re: Hawk...CJ3A 36662
« Reply #28 on: February 14, 2020, 06:45:30 AM »
Beautiful detailing.  It looks "factory fresh".
My Concept Roadster
62 DJ3A Dispatcher Half Top

Offline athawk11

  • SMF Administrator
  • Flatfender Master
  • *****
  • Posts: 2818
  • Karma: +0/-1
  • 1949 CJ3A
    • View Profile
Re: Hawk...CJ3A 36662
« Reply #29 on: February 14, 2020, 01:42:52 PM »
Thanks Steve.  And thanks for looking in. :)
2-1949 CJ3As
1-1946 CJ2A