The CJ3A Page CJ3B.info

Author Topic: PROGRESS!!!!!!  (Read 30452 times)

0 Members and 1 Guest are viewing this topic.

Offline macrisel

  • Flatfender Master
  • *****
  • Posts: 639
  • Karma: +0/-0
  • Always in the middle of a project
    • View Profile
Re: PROGRESS!!!!!!
« Reply #15 on: February 14, 2013, 05:16:22 PM »
Quote
It's really looking terrific Mac. �Love that color!! [smiley=thumbsup.gif]

Tim

Tell me about it!  I am finishing the brackets and small parts in a low gloss black and using SS bolts and nuts to install them.  The contrast is great....the Kenny Wayne Shepard song "Blue on Black" describes it perfectly.  I'll admit, when I started my restoration I didn't really have a color in mind.  Then, I found the original 3A site and seen a picture of Jonathon's '50 3A in Normandy Blue and I was sold!

Offline macrisel

  • Flatfender Master
  • *****
  • Posts: 639
  • Karma: +0/-0
  • Always in the middle of a project
    • View Profile
Re: PROGRESS!!!!!!
« Reply #16 on: February 26, 2013, 12:26:33 PM »
A few more updates. �Things have been moving pretty slow as I have had other projects keeping me busy....


Here are a few odds and ends added on showing the contrast with the blue paint with black brackets and SS bolts...


Only something a Willys person would understand. �Instead of using wood to make my kickstarter board, I found somthing a little different. �My father has just recently replaced his deck with composite boards and had some scraps left over. �Being the curious type, I decided to use it instead of wood so it wouldn't rot. �After painting it black, it is pretty hard to tell it isn't real wood. �Will it hold paint very long....who knows? �I can always come back and use wood if I need to. �The spring came from an old screen door chain. �By the way, after spending all afternoon putting this together and being very excited about finally being able to start the jeep from the driver's seat I showed my wife my progress. �Her response? �"That's nice. �What else did you get put on today?" :-? �Maybe one day I can convert her..
ANOTHER THANK YOU to Bob W's book for the measurements for this block!!


So my buddy was dying to buff the paint out and just see how slick we could make it. �Here is a teaser shot after a round of 1500 grit before buffing compound...

Offline athawk11

  • SMF Administrator
  • Flatfender Master
  • *****
  • Posts: 2818
  • Karma: +0/-1
  • 1949 CJ3A
    • View Profile
Re: PROGRESS!!!!!!
« Reply #17 on: February 27, 2013, 12:23:49 PM »
That is one shiny rig. Nice.
  
The first time you take your wife for a ride, she will be smiling from ear to ear.  Both from the excitement of the ride and from the excitement on your face.    Then, there's the view.  Everything looks better from the seat of a Willys.  Then there's the double takes and 'thumbs ups' you will get from passer by's.  There are the folks that love 'em but haven't seen one for years.  Then there are the folks that have never seen one, and aren't sure what they just saw.  A Willys ride is always a great ride.  

Be careful though, if your wife is anything like mine, she will want one for her own.

Great work Mack.

Tim    

  
2-1949 CJ3As
1-1946 CJ2A

Offline macrisel

  • Flatfender Master
  • *****
  • Posts: 639
  • Karma: +0/-0
  • Always in the middle of a project
    • View Profile
Re: PROGRESS!!!!!!
« Reply #18 on: March 12, 2013, 03:08:48 PM »
A little more eye candy to look at. �It has taken quite a bit of time and patience to paint the raised Willys logo and 4wd stencil. �Remember, I went with basecoat/clearcoat so the process was a little different than enamel paint. �Here is a rough breakdown how we did it......

1. Primer the parts
2. �Spray the white basecoat and 4 coats of clear over the "WILLYS" lettering.
3. �Let the paint cure for several days then come back and sand off the overspray, tape lines and scuff everything else up.
4. �Spray the blue basecoat and 4 coats of clear over everything.
5. �Let the paint cure for several days.
6. �Begin the LOOOONG, SLOOOOOW process of sanding the blue off the letters to get down to the white. �Be very careful to not sand too deep past the white. �Don't try to sand the letters "freehand". �We got the best results taping off the letters and sanding against the tape. �This also protects the surronding areas from getting sanded.
7. �Scuff everthing again and put 4 more coats of clear on.
 
Here is a photo of the hood prior to the last coats of clear.

Offline macrisel

  • Flatfender Master
  • *****
  • Posts: 639
  • Karma: +0/-0
  • Always in the middle of a project
    • View Profile
Re: PROGRESS!!!!!!
« Reply #19 on: March 12, 2013, 03:33:11 PM »
The tailgate is another story. �Take all the steps above and continue here....

8. �Scuff the area where the 4wd stencil goes.
9. �Put a layer of masking tape down and position the stencil (I got mine from Walcks) over the tape.
10. �CAREFULLY use a knife to cut the stencil into the tape. �Use extreme caution to only cut through the tape and not the paint underneath!
11. �Spend the next 2 hours peeling the tape out of the letters.
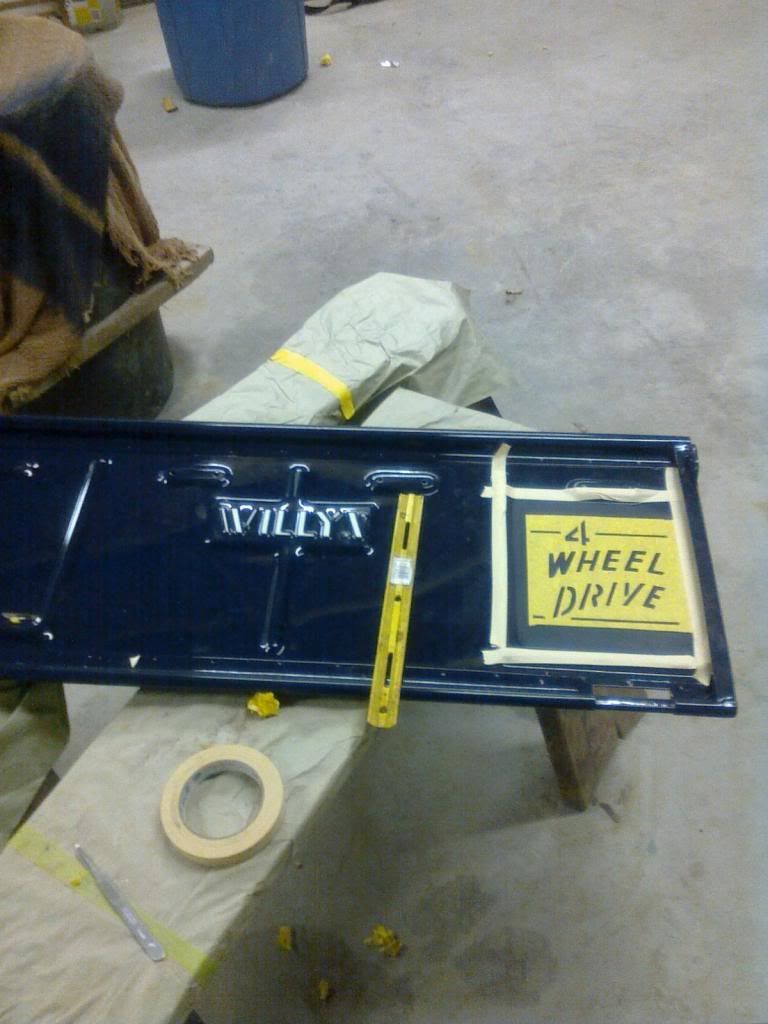
12. �Spray a coat of white basecoat on to the letters (tape off the rest of the tailgate to limit overspray)
13. �Remove the tape and sand off any paint that bleeds through the tape
14. �Spray clear over the stencil letters
15. �Let it cure for a day or two and come back and scuff the entire tailgate and spray 3-4 coats of clear over everything!

Doing it like this should give you very sharp, clear lines on the stencil and have it flush with the rest of the paint. �Any scratches or nicks in the future will be limited to the top layer of clearcoat and can be easily fixed without have to touch up the white letters. �Very labor intensive, but I hope its worth it. �The tailgate is taking longer to complete than the entire tub!

Offline garage gnome

  • Flatfender Master
  • *****
  • Posts: 1947
  • Karma: +0/-0
  • Rustologist
    • View Profile
Re: PROGRESS!!!!!!
« Reply #20 on: March 12, 2013, 03:54:06 PM »
Looking good! Did you get a lot of fuzziness around your stencil letters? I hand painted all my Willys scripts and I bought a different 4WD decal for mine since I don't care much for the original one.


« Last Edit: March 12, 2013, 03:57:35 PM by garage_gnome »
Nate in Western MA 1953 3A #3268, The Jalopy, '47 2A Wheelin' rig, '49 3A, #37071, unmolested, bone stock named Ted

Offline macrisel

  • Flatfender Master
  • *****
  • Posts: 639
  • Karma: +0/-0
  • Always in the middle of a project
    • View Profile
Re: PROGRESS!!!!!!
« Reply #21 on: March 13, 2013, 12:07:08 PM »
There is no fuzziness around the stencil letters.  The tape left a very sharp, defined line to all the letters.  That was the reason my friend decided to lay down masking tape and cut the letters out vs. just using the stencil and spraying the paint over the top of the stencil.

There is a LOT of great info we reviewed on the 3B page about different stencils and how they were applied.  Several factors steered us this direction including:

1.  I am using basecoat/clearcoat instead of enamel paint
2.  We wanted the letters to sit flush with the paint instead of being raised
3.  We wanted the letters to be protected under layers of clearcoat
4.  I wanted the stencil to be very sharp and have very crisp lines...almost like a vinyl decal without being raised above the paint.

Offline macrisel

  • Flatfender Master
  • *****
  • Posts: 639
  • Karma: +0/-0
  • Always in the middle of a project
    • View Profile
Re: PROGRESS!!!!!!
« Reply #22 on: March 26, 2013, 05:18:13 PM »
So I finally got the grille and drivers side fender mounted. �After that, I sat the hood on just to see what it would look like and to keep me motivated. �My dad is in the first photo and was very impressed with how it looked. �He had not seen it since December 31, 2012 and he probably took 8-10 photos with his phone from different angles. ;)


And one more of the hood and the WILLYS emboss. �I love how this turned out..look how clear that reflection is in the fender!


I'm hoping to get started on my wire harness this weekend!

Offline garage gnome

  • Flatfender Master
  • *****
  • Posts: 1947
  • Karma: +0/-0
  • Rustologist
    • View Profile
Re: PROGRESS!!!!!!
« Reply #23 on: March 27, 2013, 10:27:42 AM »
Looks great!!!!
Nate in Western MA 1953 3A #3268, The Jalopy, '47 2A Wheelin' rig, '49 3A, #37071, unmolested, bone stock named Ted

Offline BMIC

  • Willys Guru
  • ****
  • Posts: 406
  • Karma: +0/-0
  • Weekend Mechanic
    • View Profile
Re: PROGRESS!!!!!!
« Reply #24 on: March 28, 2013, 06:57:37 AM »
Nate, Marcrisel...My complements! Your two artists at work, I doubt they came out of the showroom looking better then that.
We are masters of the unsaid words, but slaves of those we let slip out... WC

Offline macrisel

  • Flatfender Master
  • *****
  • Posts: 639
  • Karma: +0/-0
  • Always in the middle of a project
    • View Profile
Re: PROGRESS!!!!!!
« Reply #25 on: April 16, 2013, 01:00:58 AM »
Another update. �I've been pretty busy on the weekends working on a few little things. �I have managed to get my wiring harness from Walcks installed..


...And everything actually works!


I have also managed to get my steps, gas tank, and drivers seat installed. �No more driving around with a plastic gas can on the front bumper!


Its getting so close I'm going crazy trying to find time to work on it and finish it! :o

Offline garage gnome

  • Flatfender Master
  • *****
  • Posts: 1947
  • Karma: +0/-0
  • Rustologist
    • View Profile
Re: PROGRESS!!!!!!
« Reply #26 on: April 21, 2013, 08:24:14 AM »
Looks great! Keep it up!
Nate in Western MA 1953 3A #3268, The Jalopy, '47 2A Wheelin' rig, '49 3A, #37071, unmolested, bone stock named Ted

Offline 1955CJ-5

  • Flatfender Master
  • *****
  • Posts: 2360
  • Karma: +0/-1
  • It wasn't always green....
    • View Profile
Re: PROGRESS!!!!!!
« Reply #27 on: April 22, 2013, 11:39:59 AM »
It looks really nice....I should be so lucky!

Where did you get your seat cushions?

Randy
1955 CJ-5, A friend for 58 years....1951 CJ-3A, a new addition. 1929 Model A Ford Closed Cab Pickup...

Offline macrisel

  • Flatfender Master
  • *****
  • Posts: 639
  • Karma: +0/-0
  • Always in the middle of a project
    • View Profile
Re: PROGRESS!!!!!!
« Reply #28 on: April 22, 2013, 01:05:00 PM »
The cushins came from Beachwood Canvas.  While they are more expensive than some other places, the quality, craftmanship and service are second to none.  

The cushins are actually a 2A cushin, not a 3A.  When I ordered them, they asked me how tall I was.  When I told them 6'4", they laughed and said I probably wanted the 2A cushins because they are actually 2-3" thinner than a 3A cushin and would give a little bit more room behind the steering wheel. ;)

I drove the jeep around the farm yesterday and let me tell you.....2-3" makes a BIG difference behind the steering wheel!

Offline 1955CJ-5

  • Flatfender Master
  • *****
  • Posts: 2360
  • Karma: +0/-1
  • It wasn't always green....
    • View Profile
Re: PROGRESS!!!!!!
« Reply #29 on: April 22, 2013, 07:13:54 PM »
Thanks Mark,

I got a copy of Bob W's book and have been looking at the original colors..not much choice, gray or OD...I think I'll order black as you did.....My CJ-5 top is a Beachwood, and I agree. Excellent quality and it just has that "look"....

What a good feeling it must have been to get to drive it!!
1955 CJ-5, A friend for 58 years....1951 CJ-3A, a new addition. 1929 Model A Ford Closed Cab Pickup...