The CJ3A Page CJ3B.info

Show Posts

This section allows you to view all posts made by this member. Note that you can only see posts made in areas you currently have access to.


Messages - Doug_3B

Pages: [1] 2 3 ... 7
1
Engine compartment / Re: Help! Engine Tuning
« on: August 03, 2022, 06:55:41 AM »
For initial start up yes.  After a minute or two she'll idle fine with no choke.

2
Engine compartment / Re: Help! Engine Tuning
« on: August 02, 2022, 08:48:49 PM »
I appreciate the replies guys.  Sorry for the long post above; I was out in the heat all day and fed up.

Hi Doug, I'm sure you know what your doing

We probably shouldn't assume that Percy! LOL  You're right, that is way too far out.  And, that was with the new carb that I had on there.  I put my old carb on and we're right about 1-1/2 turns out from bottom.  And making the idle mixture adjustments, it works exactly as you said in your post:  back it out to a certain point and there are no more gains.


Quote
I'm confused. What, exactly, is the idle RPM right now? What, exactly, is the vacuum reading?

OK, I have my old carb back on there that I put the Zip kit into.  As far as I know, I put the whole kit in there, but it's 10-12 years ago.  I did not do anything with the throttle shaft, or bushings, or anything like that.

I went back out tonight and with the old carb on there, things seem pretty good - at least a lot better than I've gotten it to run in a long time.  However, idle is still way high, and I seem to have a slight miss.  Idle is at 1000 - 1100 depending on if you believe my dwell/tach/volt meter (1100) or the tach in the cab (1000).  However, vacuum at this point is probably the best I've seen at 20.5 in Hg.  If I back the idle stop screw out any more to lower RPM, I really start to lose vacuum and it becomes erratic.

3
Engine compartment / Help! Engine Tuning
« on: July 31, 2022, 08:46:32 PM »
Alright guys, I am so frustrated with my 3B - I just can't seem to get it tuned right. 

My setup:  1963 CJ3B with the F134 engine.  Pretty stock.  Complete rebuild in 2012, only have 4-5k miles on it since then.  It ran good, but always seemed to run rich.  I'm running an alternator, a Carter YF that I put a zip kit in around the time of the engine rebuild, and I don't have the oil bath air filter, I have the K&N canister connected to the air horn on top of the carb.  In the course of troubleshooting, I sent my distributor off to be tested/rebuilt and there was so much wrong with it that it was going to cost so much to repair that I could by 2-3 new distributors.  I probably made a mistake by buying a new dizzy, but I still have the old one that can be rebuilt at some point.  The new points style dizzy is currently installed in the engine. 

I found the procedure to tune the engine using the vacuum method by ScoutPilot.  I was excited to try it and get my engine tuned right.  Some of the issues I run into:  with the idle stop screw 3 complete turns in, I'm running at about 1400-1500 RPM.  At this point, I have about 18 Hg.  When I start to back off the Idle stop screw, absolute best vacuum I get is 19 Hg.  When that happens, she's still running at 1100-1200 RPMs, so adjusting the idle mixture screw does nothing.  I even thought maybe I had a crappy vacuum gauge, so bought a second one to be sure.  No change.

I've checked/adjusted valves twice.  Replaced the distributor - points are set really close to .020", but dwell is around 44; it's about the closest I can get it.  The cheap points mounting plate in the new distributor does not have the adjustment eccentric screw, so I probably adjusted them 15 times today and this was as close as I got.  Over the last year, this problem flustered me and I started throwing money at it.  I put in a new fuel pump and line from tank to pump (Walck's kit).  In addition to the new distributor, I also got a NOS Carter YF carb from India and put that in.  I think that new carb may have issues, so I have my original back on.  New plugs, and a Flame thrower coil on it because I was planning on swapping to a Pertronix.  New points, condensor, cap and rotor all came with the new distributor.  I have new wires to put on it, but have not done that yet.  I know better than to throw money at a problem and change out a bunch of components and I did it anyway.

Today, I decided to go through Section C in the Service Manual, paragraph by paragraph.  I didn't get all the way through it, but probably half way or so.
I did the compression check (all plugs out, choke and throttle wide open)
#1 - First crank 60 psi, 4th crank 110 psi
#2 - First crank 70 psi, 4th crank 110 psi
#3 - First crank 70 psi, 4th crank 105 psi
#4 - First crank 70 psi, 4th crank 110 psi

Pretty consistent if nothing else.

So, I poured some oil down inside the cylinders and rechecked
#1 - First crank 80 psi, 4th crank 120 psi
#2 - First crank 80 psi, 4th crank 120 psi
#3 - First crank 80 psi, 4th crank 110 psi
#4 - First crank 70 psi, 4th crank 120 psi

If I understand the manual correctly, this low reading on the first crank and building up pressure indicates cylinder wall/ring wear or valve adjustment.  That's why I added the oil like the manual said, to narrow down between the two.  It improved it but only slightly.  Does this indicate valve issues?  I've checked valves twice now, using the opposing valve method. 

I'm not hoping that I have valve issues, but if I do and correct it, I'm then hoping my vacuum readings improve and maybe the rest of the tuning procedure works.

What do you think?  Am I on the right track?  What else should I be looking for?  What have I left out to complete this story?

I worked on it for probably 4 or 5 hours in 100+ degree temps today.  It's now running decently; although idle is about 1100 RPMs.  It's the first time in probably a year that I'd chance a run around the block.

I did time with a timing light and had it idling at around 600 - 700 RPM, but still not sure it was correct.  The idle adjustment screw on the carb seemed like it was way far out - 3 or 4 turns something like that.  The timing light fell down and went through the fan today, so I'll be without one for a week or so.  Another thing I noticed when using the timing light, it seemed like it had a periodic miss where I didn't seem the timing mark on the pulley; I'm guessing it's because the light didn't strobe.  Crappy timing light or it didn't pick up the current in the wire - bad wire?

Thank you for any help in advance!

4
Kind of an old post, but I'll add my experience in case it helps someone.  I used an aluminum radiator from JEGS.  https://www.jegs.com/i/Champion-Cooling-Systems/166/CC4964/10002/-1#

It was a direct bolt in replacement to the grille.  The issue arrived when I tried to put on the fan shroud.  The fan shroud did not fit without modifications.  I was not comfortable screwing the fan shroud into the side of the radiator like it was with the old one.  I ended up trimming some parts of the fan shroud to make it fit and then welded on longer sides so it mounts using the same bolts as the radiator uses to mount to the grille.

Now, how well it works and how long it lasts is anyone's guess.  I think I've only had it up to operating temperature once since the swap. 

I did keep my original radiator.  Plan to take it to a radiator shop one day so it's ready to go should I need it.

5
Your CJ-3B Project / Re: My 1963 CJ3B Build Thread
« on: April 22, 2021, 07:24:56 PM »
Thanks Scott!  I appreciate the information!

6
Your CJ-3B Project / Re: My 1963 CJ3B Build Thread
« on: April 10, 2021, 05:57:58 PM »
Hey Jack!  It's awesome to hear from you!  The day before yesterday, your number came up when I was searching for a contact in my phone.  I hope you're doing well and I'm glad to see you are adding to the fleet.  I don't know if you remember Hayden, a young guy who went with us on just a couple jeep trips.  He was working diligently on a white CJ5 for quite awhile.  I saw his CJ5 up on Craigslist back in 2016 and tried my best to ignore it, but he kept lowering the price until I couldn't pass it up.  I had it for about 3 years.  Did a bunch of body work on it and got it barely running and driving.  Then it sat for a couple years, in the way, and I finally sold it just before Covid hit.  The guy that bought it stopped by about 4-6 weeks later and it was all fixed up, painted, and on the road.  He didn't waste any time.  Now, I daily drive my 91 YJ and work on the 3B sometimes. 

I will indeed let you know if I plan to be in your neck of the woods.  It would be great to catch up.

7
Your CJ-3B Project / Re: My 1963 CJ3B Build Thread
« on: March 02, 2021, 08:01:06 PM »
I've been working on this project for awhile - and it's not done yet, but I thought I'd post up some pics.

My wife REALLY likes driving the ole 3B, so I want to make it as safe as I can.  One of these days, it will be upgraded brakes, but for now, lights.

Original lights:


I bought these LED lights to replace the original:


Awhile back, I bought some rough headlight buckets because I didn't want to modify my originals.  These LED lights were a REAL close fit.  I probably didn't have to cut for them to fit, but I didn't like the way it kind of trapped the wire and if those fins are to dissipate heat, then I figured they should be a little more exposed.  Here is the rough outline of what I was going to cut:


Here you can see that the LED light fits without cutting anything:


And here's what I ended up cutting out:


Here is after I smoothed out the edges:


Next up was the headlight connector.  Luckily, the contacts were really easy to extract to clean up and solder new wires on:


Here we have it painted up nicely and the new harness in place:


And a quick test of the daytime running lights:


Other side installed:


Daytime running lights test:


Low beam test:


High beam test:


I still have to wire it all together.  I'm trying to clean up my wiring harness as I go as well.  Had a small problem on the trail last year and don't want a repeat.  I'll be using waterproof relays to power the lights.  I'll post more when I get more done.

8
Engine compartment / Re: CJ5 Rear Fuel Tank on a CJ3B
« on: February 12, 2021, 10:20:03 AM »
So, sorry that I'm resurrecting an old thread - the site even gives me a big red warning asking if I'm sure I want to reply LOL.

I'm interested in doing this mod one day myself.  I recently watched a YouTube video where a guy installed a rear fuel tank into a 3B.  I thought he did a real nice job of it.

Thought I'd share the link in case anyone is interested.  https://youtu.be/MbdD2poW_9I

9
Your CJ-3B Project / Re: 3B Project
« on: January 22, 2021, 01:27:14 PM »
That is a really interesting build!  You sure didn't waste any time on it.  I like it - thanks for sharing!

10
Your CJ-3B Project / Re: My 1963 CJ3B Build Thread
« on: January 22, 2021, 01:11:34 PM »
I believe that if you drive real fast, the pressure differential will pull the top upwards to clear your head.  When you feel the top on your cranium, you'll know you've slowed down.

 ;D ;D ;D

Too bad it only has 72 HP and is less aerodynamic than a cow!  That top is bopping me on the head constantly!

11
Your CJ-3B Project / Re: My 1963 CJ3B Build Thread
« on: January 22, 2021, 11:05:33 AM »
This past weekend, I spent a few hours out in the garage with the Jeep.  Didn't get a lot accomplished, but this was a project I needed to do for years.

The bikini top straps from New Life weathered the Idaho elements rather well, but finally began to break down


Enough finally broke off so I couldn't reach the footman loop any more, so to get a few more years out of it, I added the eye bolts to each side.  This year, one side finally gave up for good.


I bought and used this speedy stitcher awl in hopes that it would do the job.


It actually worked great.  I did have to buy the smaller needle than the ones that came with it.  The smaller needle came in a two pack and a good thing too - on the last strap, the first needle broke.  I only poked my fingers a couple times and none of them were bad.  I was probably out there a total of 3 or 4 hours.


I made the new straps a bit longer than the originals.  I want to find a way raise the bikini top a couple inches to get a little more head room.  It rests against the top of my head and if it's loose at all and starts bounce up and down - that gets annoying real fast!


I will be very thankful I did this come the summer.

Right now, we're working on a carb problem that causes it to run VERY rich.


12
Your CJ-3B Project / Re: My 1963 CJ3B Build Thread
« on: January 22, 2021, 10:54:09 AM »
OK, so this is posted over in another thread, but I figured I'd add it here as well.

OK, so I cleaned up a spot to work in the garage, and dug out the welder today.  The seat is installed, seat-back problem fixed, and new pegs from Mike installed and working beautifully.  Basically, I cut off the old pegs on the rear legs.  I took some pipe that I had laying around and added it in.  I'll go through the process below.  Yes, I could have used some smaller diameter pipe, but I didn't have any laying around and I didn't want to go looking for some.  It's functional, sturdy, and hidden by the tailgate. 

My original problem was that the seat back leaned too far back and stuck out past the rear edge of the Jeep by probably 3-1/2".  Additionally, the locking pegs that came on this seat didn't lock in properly.

Here, I'm just trying to figure out how much I needed to add into the rear legs.  Came out to around 2-5/8"


Here is the pipe I had laying around. 


I started by cutting off just one side.


Here are the two pegs side by side.  The one from Mike on the left.


No fabrication project is complete for me unless I get bit by the angle grinder.  I love the mesh backed mechanics gloves, but here's what happens


I decided to weld the new peg onto the extension first.


I haven't welded in awhile....


Then I placed the peg into the clip, and then the seat leg into the extension.  This way I was sure to have the alignment correct.  Tacked it in place and then removed and finished welding.


Then you do the same to the other side.  I measured to make sure the seat sat level to the bed.


Little bit of paint and she don't look bad from far away


Clears the tailgate and will clear a hard top or soft top


Now, one day I'll put some cushions on it


The pegs from Mike work great; highly recommended!  The seat used to pop out of the clips practically by themselves, but not anymore!  To get the seat out, you have to really want it!

13
BODY and trim / Re: Rear Seat Questions
« on: January 02, 2021, 08:36:23 PM »
OK, so I cleaned up a spot to work in the garage, and dug out the welder today.  The seat is installed, seat-back problem fixed, and new pegs from Mike installed and working beautifully.  Basically, I cut off the old pegs on the rear legs.  I took some pipe that I had laying around and added it in.  I'll go through the process below.  Yes, I could have used some smaller diameter pipe, but I didn't have any laying around and I didn't want to go looking for some.  It's functional, sturdy, and hidden by the tailgate. 

For my original problem, you can go back to the beginning of this thread and see pictures, but basically the seat back leaned too far back and stuck out past the rear edge of the Jeep by probably 3-1/2".  Additionally, the locking pegs that came on this seat didn't lock in properly.

Here, I'm just trying to figure out how much I needed to add into the rear legs.  Came out to around 2-5/8"


Here is the pipe I had laying around. 


I started by cutting off just one side.


Here are the two pegs side by side.  The one from Mike on the left.


No fabrication project is complete for me unless I get bit by the angle grinder.  I love the mesh backed mechanics gloves, but here's what happens


I decided to weld the new peg onto the extension first.


I haven't welded in awhile....


Then I placed the peg into the clip, and then the seat leg into the extension.  This way I was sure to have the alignment correct.  Tacked it in place and then removed and finished welding.


Then you do the same to the other side.  I measured to make sure the seat sat level to the bed.


Little bit of paint and she don't look bad from far away


Clears the tailgate and will clear a hard top or soft top


Now, one day I'll put some cushions on it


The pegs from Mike work great; highly recommended!  The seat used to pop out of the clips practically by themselves, but not anymore!  To get the seat out, you have to really want it!

14
Gearboxes and axles / Re: Clutch x shaft pivot ball bracket broke
« on: January 02, 2021, 09:43:15 AM »
that's crazy Randy!  Last summer when I met up with Todd for a trip up around Ridge Road, my clutch was feeling weird.  Engaging right off of the floor, and when shifting, I was getting some grinding.

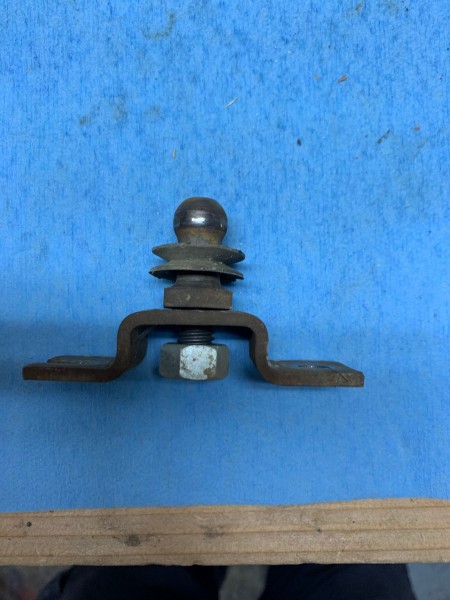
Back at home I crawled under the Jeep and found the nut that holds the pivot stud to the bracket on the frame was loose.  This caused the pivot tube to be at a weird angle.  Once I tightened it down, my clutch problems went away.  I'll put a washer and a nylock on there before next trail season.

Here is what I had going on:


15
BODY and trim / Re: Rear Seat Questions
« on: December 30, 2020, 09:16:06 AM »
I haven't done anything with mine yet either.  I have to dig out the welder today or tomorrow to weld an O2 sensor bung into the YJ's exhaust and install a catalytic converter or they're going to pull my registration for no emissions.  While the welder is out, I may take a look at the seat frame and weld in the new pegs.  I have to figure out whether to shorten the front legs of the seat or lengthen the back ones so the seatback clears the tailgate.

Simple projects, but man it takes some dynamite lit under my butt to get me moving these days!

Pages: [1] 2 3 ... 7