The CJ3A Page CJ3B.info

Show Posts

This section allows you to view all posts made by this member. Note that you can only see posts made in areas you currently have access to.


Messages - Dutch_Jeeper

Pages: [1] 2 3 ... 6
1
I'm almost certain it will work depending on your bellhouse!

There are 3 different flywheels. Very early CJ3a's and MB's, CJ2a's have a 97-Tooth flywheel which takes the 10-tooth starter, these mount differently in the bellhousing (also different) and the metal plate between the engine and flywheel is different to, they will not match.

And then there are the 124 or 129-tooth which both take the 9-tooth starter. The 9 tooth starter is the same in both 3A and 3B, available in 6 volt, 12 volt or 24 volt. The Cj3a and Cj3b both have the same bellhouse and the "closed nose" type starter can be exchanged as far as i am aware.

2
I'd probably buy one if they made a aluminium version :-) takes at least 200 pounds of the total weight of the Willy making it even lighter and more capable off road :-) and still retain that good old Willy whine

3
http://www.cj3b.info/Tech/SteeringWheel.html

You could try it once with a firm tap with a rubber mallet after applying penetrtating oil for a few days and hope it pops out, if not use  the method above or you will destroy the steer and/or shaft.

4
As far as the lug pattern is concerned it's 5 on 5.5 :

Jeeps with 5 on 5.5" Bolt Pattern:
* 46-86 CJ (All Models)
* 63-73 Full Size Cherokee/Wagonner (SJ)
* 62-71 Galdiator Series Truck (All Models)

Not sure about the offset between different models.

If you are not going stock, 5 on 5,5 is also the same lug pattern as on early Suzuki Samurai's, if your looking for something different.

Largest tires you can fit without lift and clearance issues is 31 x 10.5 i believe, not entirely sure on that one though.

5
Sounds like the start of shimming or deathwobble, it will get worse over time.

Not sure about the free play in the steering wheel being the cause, might try a tight steer. But definately get your tires balanced and have the jeep alligned. Also check wheel bearings and tierod ends for play.

I assume you have not lifted the CJ3, but deathwobble is a common problem with lifted Jeeps. The slightest play in any part of the entire axle assembly (from wheel bearings to tie rod ends, to pitmanarm) can cause it, usually after hitting a bump, even the smallest bump on a flat road. The bump causes the entire axle to start shacking violently, up to the point your thrown around in your Jeep and usually only a full emergency stop will stop it.

https://www.youtube.com/watch?v=ncZDRStpFms

As you can see it does not matter if you have coilsprings or leafsprings

Most people install a steering damper and it's gone, but this only camouflages the problem, it does not solve the problem and it will return eventually, probably worse.

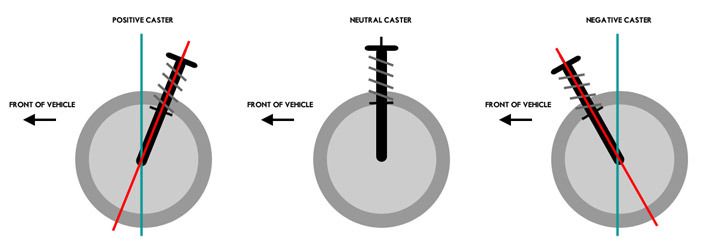
Besides play in any part, however small, the biggest issue is the caster that changes after lifting a Jeep. The top of the axle tilts forward and it gets a negative caster. You want caster to be at least neutral or best positive. In Jeeps like the TJ you need to install longer lower suspension arms, most people do not and it keeps coming back. If you have negative caster, the front axle basically starts acting like a shopping trolly with one wheel stuck that starts to flutter and you cannot steer until you stop and go again.


Now i'm not to familiar with the Willys yet as in how far the above translates to the Willys deathwobble or shaking symptoms. Mine also has steering wheel play and there is a litlle bit of play on one tierod end but no wobble or shaking at all, not even on uneven or bumpy paved roads. I did have the tires balanced and had it alligned.

So i advice to do that first before you start replacing parts. You can do the alligning yourself with a string.

Just the first hit i got on youtube:

https://www.youtube.com/watch?v=AuYsd7SUwTA

7
Most engines have replacable valve guides, removing and installing is ussually a specialist job requiring the proper tools or you could ruin your engine. They are pressed in and need to be pressed out, not hamered.

First thing i noticed though is the state of the valve seat, looks pretty damaged on the bottom of the picture. You are never going to get a good seal between seat and valve there, grinding in a new valve will not be enough.

They need to be machined and you probably need hardened valve seats installed to repair it. There are valve cutting tools that use the valve guide as centerpoint to "freshen" up the seats. But again this is better left to a specialist since most of the time the seats need to be cut at different angles. Again getting it wrong is ruining your engine.


As for cleaning the engine for painting, use paintstripper, steel wire brush degrease and spraypaint with heat resistant paint. However the best way is to plug any holes fabricate a cover for the top side and sandblast it with a rough grain, this cleans it up in the best way possible and leaves a clean but rough finish for the new paint to stick to.

8
Not familiar with the L134 valves yet, but for my old Alfa Romeo engine i used a modified C-clamp. A sliding arm clamp would also work. You only have to modify the "static" end. If it is wide enough grind/cut a slot/V/U in the middle so you can fit it around the valvestem or weld someting U shaped on (is that the correct name btw? valvestem? my grammar is a bit rusty, and technical terms are in serious need of restoration  ;) :) )

9
If you want a diesel in there you should look at diesels from Volkswagen. I do not know what versions VW sold in the US but a 1.9 Jetta or Rabbit diesel engine should be a good fit. You could step up a notch and look at the more modern TDI engines. HP ranges from 90 to 150 and tons of torque. But they need very high pressure pumps for the direct injected dieselsystem.

10
If you are not confident enough that you have a steady enough hand, look for "Frisk" film it's used for making stencils/masking for airbrushing. You still have to cut the letters yourself, but once it's on you can even use a paintroller or spraycan. The film, if applied correctly, wont let paint leak under it so you should always get straight letters. You could put it on the raised letters using a heatgun first and then cut the frisk away. It's light tack so you can easily remove it. Trick is removing it at the right time, just before the paint is dry to the touch and still flexible so you dont pull paint from the letter edge when you remove the film. It depends heavily on the type of paint you used, there's no real guideline to give other then experience.

You can also use it to make your own texts or anything, just as long as you cut straight and use sharp X-acto blades. I just finished this on the CJ3a. I used frisk film for the large areas and painted in the rest by hand:


I did'nt want to sand down the surface and ruin the patina, so the edges did come out a little bit rough. But on new or smooth paint it should not be a problem with the Frisk film and you should get razorsharp edges if you want to.


Now i'm not an artist, i do do modelscale building and paint 1/6 anime figures, but never tried to paint a drawing on a flat surface before. But she turned out pretty well i think.

11
Using a hobby brush is indeed best, use a solvent based paint, it dries slower then acrylics so you have time to clean up the edges with a cottonswap and some solvent, do not try to get it on in one go, better to apply several layers and try to get the edges straight first, then fil in the center.

Just finished a piece with raised letters on my CJ3


12
Well hotdamn she has to get out again, but not for the clutch. This weekend i was driving around and suddenly would not go into 3th gear anymore? No matter what it tried, there was no gear grinding or anything. I limped back home in 2nd gear and took the cover off. After some inspection i noticed the the 3rth gear syncromesh is bad, it does not grab the gear anymore and seems to be pushed to far out so the notches holding it in place with the keys/dogs are out of line.

There is also a bit of axial play on the mainshaft about 1,5 to 2mm that i can see on the outputside but that's just a guesstimate, i'll see if i can measure exactly tonight. The Syncromesh is actually a bit bend, though i did not try to force it in 3th gear i guess Archimedes's law on levers is alot stronger then i thought.


Bit dark, but the gears look to be in good shape.


You can just see it on these 2 pics:


Seeing how much i struggled with the whole transfer assembly last time, i have not decided yet if i will take it to a shop or do the rebuild myself. I've watched the video from Novak adapters and i'm confident i can pull it off. But having to wrestle with getting the gearbox back in again  :( :( :( the extra case adds at least another 30-40kilo's to it  :( I will probably keep an eye out for another T90 and rebuild that one myself for spare.

13
Thank you Tim, I did and it turns out i have been pretty blind this whole time, the clutchplate did disengage, so it was the pilot bushing afterall, though it is now free. Just took it for a ride and it shifts noticably better then before (before i just did'nt know, but it does shift smoother. No problems getting into first even while it is still rolling at a walking pace, which before was'nt possible. 1st to revers and back also seems smoother.

So i think i had a couple of problems before i took it apart. Besides the throwout bearing mainly in the adjustment of the clutch. I still have to do a little more fine tuning because now the cable is actually a bit loose.

Thanks for the advice

14
With the old fork back and lengthening the pivotball i can now adjust it so the bearing does not spin when the clutch is engaged.

However I still dont have enough travel to fully disengage the cluth. Could it be that it is the pilot bushing afterall?

Is there any other adjustment i can make to get more travel to rule out the pilotbushing!??

------------------------------------------------------------------------------------------------

It was the pilot bushing afterall is my guess, so i did some very, very dirty bubba, redneck, dumb or perhaps simply very stupid engineering.

Do not read beyond this if you have a heart condition  ;) ;)


So, i had to get it out again anyway, so i thought what the heck. Put it in gear, brakes full on, start it and let the clutch go. Either i would smoke the clutchplate which had to come out again anyway or the input might start spinning in the pilot bushing, something had to give. Stopped it as soon as the clutch started smoking a bit and presto, problem solved. Let it all cool down, restarted and problem gone. All done in less then 30 seconds so i do not think any damage is done. I'll finish her up next and try again later and go for a test drive.

I am fully aware how dirty this is and no idea at all if it is a permanent solution, but as said i had to get everything off again anyway and could still be that way. I would not ever recommend anyone doing this.

15
So after a good nights sleep and lots of strong coffee  :)

Noticed that the main bearing was also turning when clutch engaged, though i did have some room between bearing and fingers, it was not enough to stop the bearing from spinning. I read that this should not be the case, and a spinning mainbearing while driving will destroy it.

Clutch has been very tight from when i got it, a specialist who took a ride with me after i bought it and went to pick up some parts, did tell me the clutch engaged quite high on the pedal and it could use a bit more slack, but it was ok.

This got me thinking this morning, i unfortunatly neglected to check the old situation with the inspection cover off before i pulled it apart. Things looked in very good condition so i think the clutch has been replaced recently. Since the previous owner did not drive it that much and only short distances it did not wear that much, apart from the bearing.

So i think they could not get it adjusted properly, or did not adjust it properly to begin with back then and the main bearing was always spinning and that destroyed it, probably the long drive home after i purchased it, definately killed it.

Back to this morning, I could not get enough clearance between the bearing and pressure plate fingers, hence it was spinning wiht clutch engaged. I could get just enough clearance i could see the bearing slowing down a bit but stil spinning.

So i took the new fork out and compared it to the old one. I found a couple of things, the old one sits 1 milimeter lower on the pivot ball and the ends that push the carrier are 2 milimeters less thick, so with the old one the bearing sits 2 mm further from the pressure fingers.

The new fork also has more angle.

placing it on a flat surface and measuring from the surface to the top the the carrier end is 2,7 mm high opposed to 2.6 mm high for the old one.

The cable end 4,7 centimeters high for the new opposed to 4,5 cm for the old.

Now trying to wrap my head around these measurements:

-The lower measurements on the old fork, should give me enough adjustment room to stop the main bearing from spinning along.

But:

-The less steeped angle of the old on, gives me even less travel to fully disengage the clutch plate?

Now to the pivotball, i found this topic: http://g503.com/forums/viewtopic.php?f=4&t=196583&hilit=clutch

mine is the 0.3 inch one instead of the 0.4 inch one wich gives me 0.1 or 3 millimeters less clutch disengagement.

So i think the problem is they adjusted the clutch such that the bearing was always under pressure and spinning to get enough clearance to fully disengage the clutchplate. Because the pivot ball is simply to short you can never get enough leverage distance to fully disengage and adjust it so it does not spin along.

So here's what i'm going to try to do to what i think should solve the problem.

Use the old fork but put a 0.1 inch/3mm ring behind the pivotball so i should get more travel from the fork!??

Keep you all posted

Pages: [1] 2 3 ... 6