The CJ3A Page CJ3B.info

Post reply

Note: this post will not display until it's been approved by a moderator.

Name:
Email:
Subject:
Message icon:

Verification:
Type the letters shown in the picture
Listen to the letters / Request another image

Type the letters shown in the picture:
Write the word between words Jeep from this JeepWILLYSJeep?:
How many slot has a GPW grill?  7 - 9 - 11:

shortcuts: hit alt+s to submit/post or alt+p to preview


Topic Summary

Posted by: BrJeeper
« on: Today at 06:41:41 PM »

Nando,
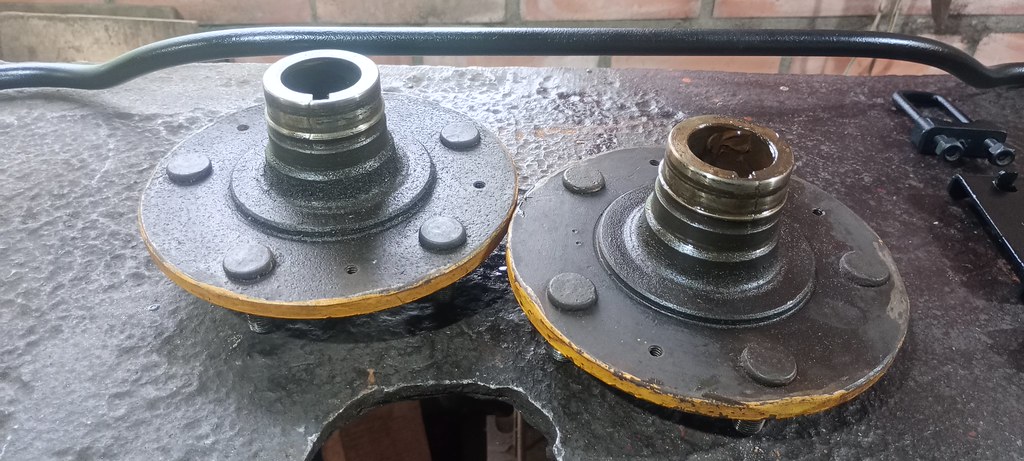
Nice progress!  Help guide my eyes on the image of the yellow backing plate.  Are the mounting holes cracked or was there something else hiding in plain sight?

Also, I'm not sure how much you needed to prod your body shop contact, but it sure seems like they are very accommodating! That was a difficult hurdle for me.
Rus, the problem with the yellow backing plates was the holes for the adjusters. All 4 holes in the front backing plates were wallowed out, the worst being the left one in that picture.

As for the body shop guys, they're old friends of Dad and I. They're located on the small town were our farm is located, rather than the city we live in, and while they might not be the best out there, they're very accommodating indeed! Most body shops around here most likely wouldn't take the Jeep, or if they did, it would take a couple of years to get it done.

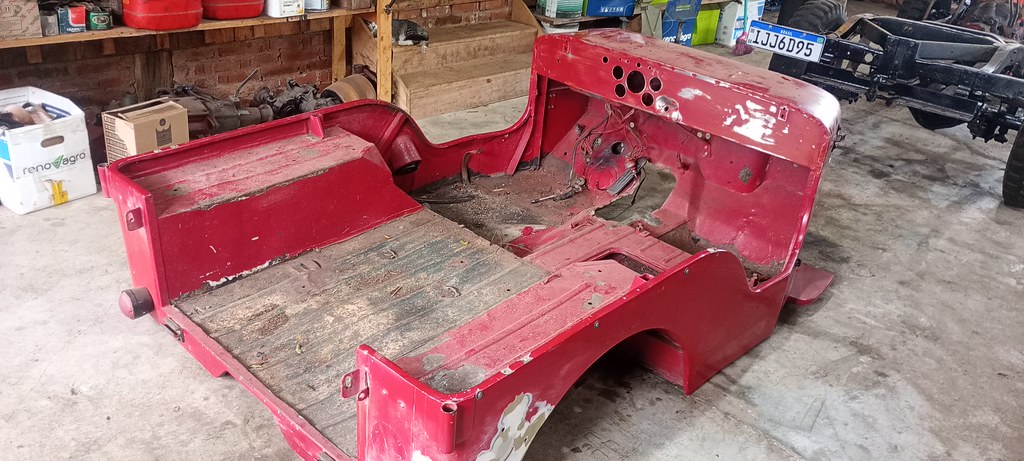
I took a few pictures of the body temporarily mounted on the frame (actually how dad transported it home) to complement the last post. It's currently sitting in the enclosed garage along with my late grandpa's collection, rather than the workshop, to avoid dirt and dust.


Nando.
Posted by: Rus Curtis
« on: Today at 11:18:53 AM »

Nando,
Nice progress!  Help guide my eyes on the image of the yellow backing plate.  Are the mounting holes cracked or was there something else hiding in plain sight?

Also, I'm not sure how much you needed to prod your body shop contact, but it sure seems like they are very accommodating! That was a difficult hurdle for me.
Posted by: BrJeeper
« on: August 21, 2026, 10:45:51 PM »

I have some catching up to do with the thread. We did a lot of work since the forum went down and even after, but I was a bit slacking on uploading the pictures.

Continuing were we left off:
New spindle bushings


Then, went to disassemble and clean the backing plates, and found this...


To the spare parts pile we go


Hit the knuckles and backing plates with some red oxide.


Did the same to the hubs. on one side, the left hand studs were replaced with regular ones. (the left hands will be kept to be used in the MB)


We took a few parts to our local machinist to eliminate some play. new bushings and pedal shaft bracket tube.
Before.


After. (I forgot to take a close up shot of the brake pedal pin, which he also replaced).


In the meantime, the body was being worked on by our friends at the body shop. We decided the best course would be to replace the entire front floor. Note the amount of body filler that was used...


Toolbox patched and is ready to be re-welded (thankfully, the Jeep script was not rotten or cut).


The toolbox drain was missing. The body shop copied it from the original one in my 3A


Back to us: Brake hardware cleaned, painted and assembled (with new linings).


Note we also removed the second tie rod end hole that had been welded to the knuckle, we returned to the original steering system. Nothing wrong with switching to a crossover system (my 3A is set up like that), but this one had been so poorly executed...


Back on it's wheels at last.


To wrap it up, I installed this early set of AVM locking hubs (patterned from the old style Warn hubs) that I refurbished a few months prior.


On the body, the guys made their progress as well:
Remade water drain.


Floor swap pretty much wrapped up. Dad and I sourced the missing toolbox lid hinges, and the remaining stuff (Gas tank bracket, seat captive nut, PTO opening) were transferred over from the old floor.


Steering arms are in, like i mentioned, we reverted to the stock style tie rods.


Rebuilt pedal shaft, master cylinder back in place.


And then, with the frame ready, I decided to strip it in preparation for paint.
It was a couple of weeks, many days spent only on this, wire wheeling and hand scraping/sanding what the grinder couldn't reach...
Also, committed some OSHA violations I guess?


After doing all that, I wouldn't do it again... If I ever have to clean a frame again, it's getting media blasted, no matter if I have to tear everything back down and deal with the cost of it.

But after that, we could hit it with red oxide primer


Then, the black.


With the frame behind us, we took a break from the Jeep to work on my truck instead, swapping in the new engine.
We wanted to get the frame painted before doing that, to avoid it rusting (I should have thought my timing better, and not fully stripped the frame at the beginning of winter).

The engine swap on the truck took most of July, during which the boys at the body shop finished their part of the restoration.

The insides and underside have been scraped to remove the bedliner that had been applied.


Quite a lot came out, and that's not counting what got thrown out already.


On the outside, Dad decided not to fully strip the body, so some filler was required.
Because of that, as a Gag gift, Dad gave a mason float to the guys.


The insides, primered.


And this monday, the body was finally painted!


Well... the rear floor is looking a bit wavy...


Dad picked up the body today, and I got to say, it looks very good!
I however, forgot to take any pictures of it on the frame.... my bad :(

I did however take pictures of the little work we did in the transmission cover. I had already pointed out to Dad that it should be painted black, but I did not remember it had been cut some to allow for the shifter of the 4 speed it had previously. We took a section from a spare (CJ-5) cover we had and repaired the original one.


I've already welded it, but we still have to grind, strip, and repaint it.

That's it for now. A long post, but there was a lot to catch up to!

Nando.
Posted by: BrJeeper
« on: May 03, 2026, 11:53:57 AM »

Thanks, Fernando!  Great to see your rebuild being documented so well.  And I want to post the story of your family Jeep collection on CJ3B.info, whenever you get the chance to send me Part 2! 

Derek
Thanks Derek, I like documenting as much as i can, even if it's just for myself. On the story, I've been working on part 2, but very slowly... I'll try sending it to you soon.
Posted by: derekredmond
« on: April 15, 2026, 10:35:22 AM »

Thanks, Fernando!  Great to see your rebuild being documented so well.  And I want to post the story of your family Jeep collection on CJ3B.info, whenever you get the chance to send me Part 2! 

Derek
Posted by: BrJeeper
« on: April 12, 2026, 07:34:49 PM »

Managed to get some work done this last week. The frame is pretty much done, and we started on the front axle.

Outside holes in the frame patched, new driver's side main spring, and a used replacement second spring.


Other side, first picture taken before we finished patching the inner side of the frame.


We placed and bolted down the axle to the springs, to align everything and weld the new spring hangers in place.

We then started on the front axle. We knew there was some play on the hubs/drive flanges, but surprisingly, the wear was on the axle splines rather than the hubs.


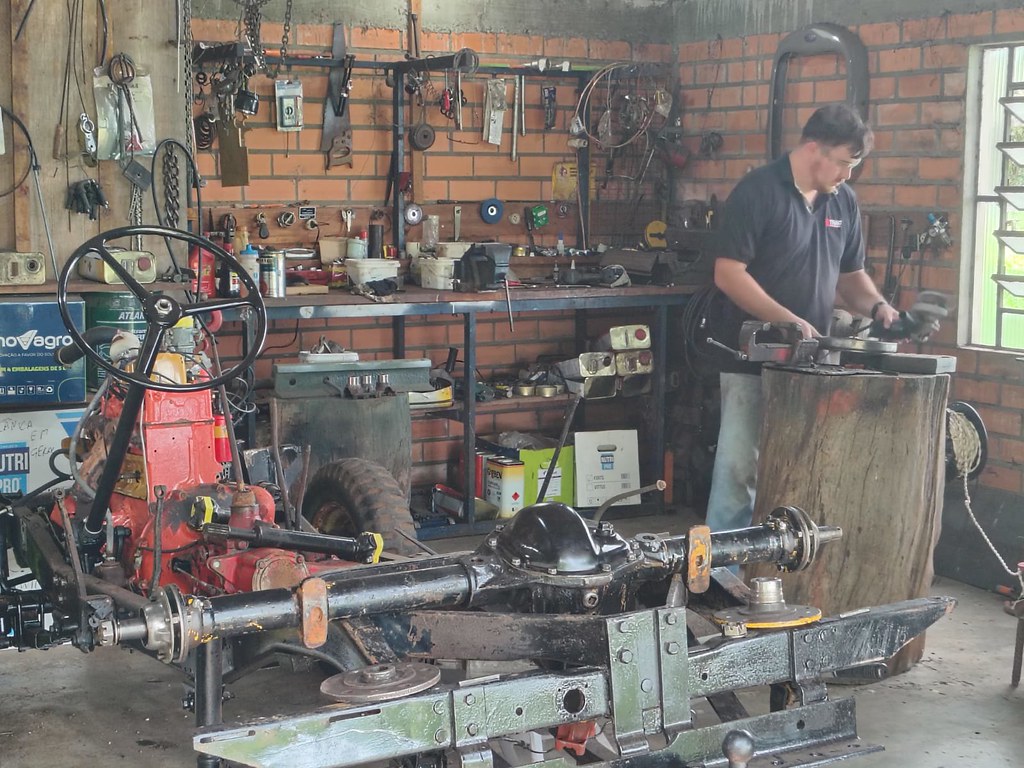
I completely disassembled both ends down to the spindle in one side, and got to the knuckle in the other. Removed the old grease and cleaned everything for reassembly.
(Don't ask me why I started taking pictures of things on the floor)


On the driver's side, we found a badly worn Rzeppa joint, but luckily, our local junkyard had 2 good outer shafts we used to piece together a good one. On the passenger's, there was a Tracta joint in good enough shape, that we're using as is (Or, I forgot to check the junkyard for a tracta outer... We'll go back next monday and see if we can find one with less worn splines)


So far, the front axle is way better than the disaster at the rear, there is no excessive wear or play, so on the diff itself, we'll just change the oil and seals. On the hubs, we'll have to replace the seals, and both bearings on the driver's side, along with the spindle bushings. On the passenger side, the bushing was missing and the spindle worn out, but we had a spare at home to replace it.

I still have to finish disassembling and cleaning the other knuckle, but things are going smoothly so far.

Nando
Posted by: BrJeeper
« on: March 24, 2026, 07:51:51 PM »

Managed to get a bit more work done these last couple of days (been busy harvesting Corn and Soybean lately)

Flipped the frame around and quickly removed the front axle and suspension, here, we're doing basically the same work as in the rear, but this time, we don't have to swap the shackle brackets


I mentioned the poor repair works done, back when we first started tearing into the rear axle, but for God's sake... welding the main spring? come on...


Since the frame is boxed around the front spring hangers, we had to use a more destructive method of removing the rivets, since we aren't reusing the brackets anyway, we cut one side to get clearance and cut the rivet heads


While cleaning up the areas where we removed the brackets from, i noticed the frame boxing looked a bit "crispy" and took the flap disc to it


Things went downhill fast...


Well, now the next step is frame repair, instead of new brackets... I'll keep you guys updated.

Nando.
Posted by: BrJeeper
« on: March 11, 2026, 08:34:50 PM »

The fabrication and speed is fun to watch!  Thanks for the pics!

CHILL casting on the block:  Is that real or AI generated?
It's totally real Rus! But i haven't been able to find anything about it yet...
Posted by: Rus Curtis
« on: February 24, 2026, 12:17:23 PM »

The fabrication and speed is fun to watch!  Thanks for the pics!

CHILL casting on the block:  Is that real or AI generated?
Posted by: BrJeeper
« on: February 22, 2026, 07:53:40 PM »

Continuing from were i left off last time...

Dirt and grime on the drivetrain, we washed the whole frame with some heavy duty cleaners.


I ended up not taking many pictures of the rear axle rebuild, but it was a mess... like i mentioned on the last post, the hub keys were assembled backwards, but the insides were not much better. There was play in the side gear splines, between the side and spider gears, and between the ring and pinion (improperly set up). We took a lot of parts from the yellow axle that came as an extra with the Jeep.
We also made a case spreader to help in the process.


That's me in the background, cleaning up the backing plates. The rear brakes were a take off from one of our other Jeeps, so everything was new, just needing some new paint.


New brake hard lines.


As the rear end got done, we moved on to the rear suspension and frame.
I had new spring hangers laser cut to replace the old ones, that had the holes wallowed,thick washers welded on to "fix" the holes, and heavy wear on the inside, we also replaced the common bolts with greasable bolts. (we still need to weld the brackets to the frame, like the originals)


The rear was pretty much the same, but the shackle brackets are actually from a donor frame section we had.
We could have used the correctly C shackles, but we only have one set, we're saving for dad's 2A, and no budget for another set.


The rear crossmember had some ugly rotten sections with angle iron welded to the inside and even some filler over it. we fixed it properly.


The battery bracket was pretty much gone, save for the "feet". i took a pattern from my 3A and we made a replacement from scratch.


Today, with the Jeep finally back on it's feet (for now) we removed the drivetrain. The next steps will be the transmission/t-case rebuild, the T-case needs new bearings and gaskets, and the 4 speed will get replaced by a T-90 like i mentioned before.


On another matter, with the engine out, i got a good look at the casting marks on the left side of the engine.

The casting date reads 4-18-C. knowing the engine is a '54 replacement, would this be March (C-3rd letter) 18th 1954?


The front casting reads 3 and chill... any known meaning behind this??


That's all for now folks.

Nando.
Posted by: BrJeeper
« on: October 17, 2025, 07:55:17 PM »

It's been a while, hasn't it? For the last months the project had been on hold, so we could work on other stuff, mostly on Dad's 1980 U-50 Jeep (Thread for that build over on EarlyCJ5.com)http://www.earlycj5.com/index.php?threads/161319/

Anyway, into the 3B!
Before we stopped, i did a test, painting the Willys script on the hood.

Set out to repaint the dashboard. Dad stripped out the old textured paint, and I welded some extra holes, primed and painted it. unfortunately, there was an issue with our paint gun at the time i did it, and we'll have to redo it.


Now, for the more recent progress.
Sanded dash again, and removed the steering box and column. This Jeep had a Gemmer unit from a Brazilian CJ-5, that had been cut short for some reason. My knees touched the wheel.

Rebuilt Ross steering ready to go in.

Last week, we decided that the best course of action would be to take the body off, since we had to repaint the engine, replace the gearbox with a T-90, and repair the rotten floorboards.
Since we already had removed some stuff, this was a pretty straight forward process, took us around 2 hours to do so.


After doing so, dad decided to also take out the 11" drums out of the back, to be replaced with the correct 9" drums, and... well, all i gotta say, is that i cringe every time someone praises "old school" mechanics and belittles new ones... what i'm about to show you is the work of some professional, with a shop, that worked in this jeep in the past.

Removed rear hubs, note anything wrong?

Yeah, both sides installed with the keys in the wrong orientation...


Not pictured, is the fact that the rear backing plate/bearing retainer assembly, had been done in the wrong order.... they put the backing plate first, then the bearing retainer, and the shims last... both rear bearing are trashed, and the shafts had around 1/4" of end play each...

That's all for now, hope to keep you guys updated more often from now on.

Nando.
Posted by: BrJeeper
« on: April 18, 2025, 06:07:05 PM »

Thanks guys! It sure fits very well at the farm.
Great work, Fernando!  For locating the spare tire mount, did you use the measurements at https://cj3b.info/Tech/Spare.html?  Are there corrections that need to be made there?  Thanks.

Derek
Derek, i started off with those measurements, but i had a hard time referencing the corners of the body.
The whole body is covered in body filler of different thicknesses, and that specific rear corner is not the straightest
Posted by: derekredmond
« on: April 13, 2025, 01:07:52 PM »

Great work, Fernando!  For locating the spare tire mount, did you use the measurements at https://cj3b.info/Tech/Spare.html?  Are there corrections that need to be made there?  Thanks.

Derek
Posted by: SteveKfl
« on: April 06, 2025, 08:07:30 AM »

Yes, it is really taking good shape and good use too.  Congrats!  Thanks for sharing the progress.
Posted by: Rus Curtis
« on: April 05, 2025, 01:45:22 PM »

Nice progress!  It looks right at home out in the field!