The CJ3A Page CJ3B.info

Post reply

Warning: this topic has not been posted in for at least 120 days.
Unless you're sure you want to reply, please consider starting a new topic.

Note: this post will not display until it's been approved by a moderator.

Name:
Email:
Subject:
Message icon:

Verification:
Type the letters shown in the picture
Listen to the letters / Request another image

Type the letters shown in the picture:
Write the word between words Jeep from this JeepWILLYSJeep?:
How many slot has a GPW grill?  7 - 9 - 11:

shortcuts: hit alt+s to submit/post or alt+p to preview


Topic Summary

Posted by: mtnman37879
« on: February 17, 2018, 08:22:33 PM »

I have found that every Ross box I've opened are short a couple of bearings. I think that's factory.
Posted by: JonC
« on: February 17, 2018, 06:34:38 PM »

Thank you for the confirmation.  After reading a number of posts, I realized that often the reproduction parts have small differences than the originals. One must be intuitive in putting it back together.
I just pulled the upper bearings out of my Ross steering box.  I discovered the steering tube and spiral gear is bent and there are 3 ball bearings missing.  So I'm going to order the parts.  Who knows what else the previous owner has done? Having you as a resource has lowered my anxiety level.  Thank you.
Posted by: athawk11
« on: February 17, 2018, 08:50:05 AM »

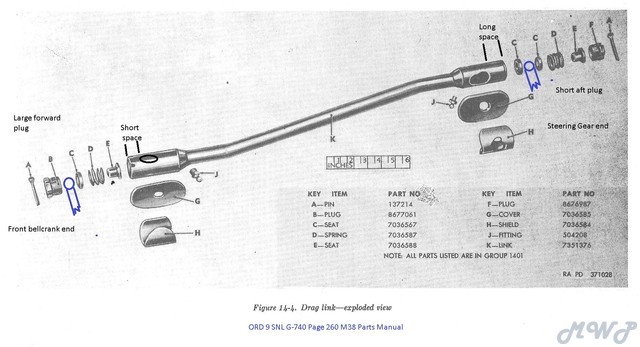
Here is the drawing.  I borrowed this from Willys M Jeeps.  They were nice enough to draw in the pitman arm and bell crank balls...


Posted by: specialty
« on: February 17, 2018, 04:46:43 AM »

to bring up the drawing just click on the link Tim provided, I did and it came right up.
Now for the steering box the ball bearings you speak of are for the steering wheel shaft. It runs from the box up to the steering wheel. You can purchase the kit to rebuild the box. It will contain the 2 bronze bushings where the steering arm that connects to the drag link is located. If the the steering arm has any play or leaks these bushings need to be replaced. The ball bearings you speak of are located at the top and bottom of the worm gear that runs up to the steering wheel. you will also need the kit to rebuild this if you are missing a ball. probably worn out anyway. It will have the bearings and the shims to set this up.
I found while doing my Willys if I googled or searched the topic of what I was working on I could find plenty of videos, drawings, and parts to accomplish this. Since these parts are part of the steering, it is very important that these parts be set up properly for obvious reasons. Kaiser Willys has a instruction video on this and many other things you will run across. Good luck.
Posted by: JonC
« on: February 16, 2018, 11:04:50 PM »

Thank you for your help.  I bought the kit and it had 4 ball seats which confused me. Your response was very helpful.  You reference a drawing but I don't know how to pull it up, nor have I figured out how to access 3rd party hosting in photo bucket.
I would like to post a photo but I don't know how to do that yet either. 
My next question will be about the Ross steering box. I opened the box, cleaned out all the grease, removed the zerk fitting, and have a plug for the filler hole. Now that it is all cleaned out, it appears that there is a ball bearing missing. Or should there be a gap about the size of one ball bearing in the race?
Posted by: athawk11
« on: February 14, 2018, 12:20:03 PM »

Hi Jon,
Welcome to the 3A Page.� It's been a while since I've assembled a drag link, so hopefully I'm not pointing you in the wrong direction.

This is a pretty good additional thread describing the challenges.� At some point, we all came to the consensus that Willys Overland forgot to draw in one of the ball seats in the first drawing.� You can see the improved drawing (2nd drawing) that shows the additional ball seat. (listed as #3 in the first drawing and �C� in the second drawing...on the right side of the drawing)

http://www.cj3apage.com/cgi-bin/3Ayabb26/YaBB.pl?num=1455985447/8

This is the contents of the kits that vendors are offering�


Using the second more accurate drawing, the bell-crank ball will fit between the B and C in the drawing.� The steering arm ball�or Pitman arm ball will fit between the C and C in the drawing.� Hope this helps.
Posted by: JonC
« on: February 13, 2018, 08:57:56 PM »

This is my first attempt in posting about my 1949 CJ3A.  I have bought a steering connecting rod kit from KaiserWillys.  When I disassembled my jeep I found that the previous owner had put spacers and washers to make it work and now I have no idea how the original parts should be.  Looking at the service manual I am confused by the picture and the instructions.  I have scrolled through many of the posts and am still not clear.  Can anyone help me? Jon
Posted by: athawk11
« on: May 27, 2012, 11:15:49 AM »

John,

Proper function of the drag link will require all three ball seats.  From what I have read, the photos is the parts manual are sometimes missing key information.

As Tom mentions in this post, when you dis-assemble your old link, pay close attention to the order.  The parts are not the same on both sides.

Best of luck,

Tim
Posted by: Shalka04
« on: May 27, 2012, 04:02:07 AM »

Quote
Rocketeer had some interest in the contents of a Drag Link repair kit. �This is what is included when ordering from Walcks.


There are not two sizes of end caps in this kit.

Also, I believe I know how the parts are assembled, but the drawing of the Willys parts manual 'drag link' �(above post) does not show 3 of the concave ball seats that are on the left in my photo. �It only pictures 2.

Tim

Hey Tim,
Did you ever figure out what the deal is with the 3rd concave ball seat?  I just opened up my shipment from Walck's and it looks just like your picture.

Regards,
-John
Posted by: macrisel
« on: March 02, 2012, 03:31:25 PM »

Retire!?!?!?  :o  There is too much good information to retire it!  Besides, it is a great story!

Do the world a favor and keep it going!
Posted by: rocketeer
« on: March 01, 2012, 04:35:58 PM »

Thank you. It's been a long time since I updated it. I have to decide if I want to go through all that or just retire it. �:-/

Larry
Posted by: athawk11
« on: March 01, 2012, 04:08:35 PM »

Thanks Larry.

By the way, I really enjoyed your web page.

Tim
Posted by: rocketeer
« on: March 01, 2012, 12:49:37 PM »

Quote
I wonder if I'm going to have to re-adjust my toe in once I'm all back together?

Tim
I don't think you'll have to if you haven't had the tierods disassembled but it's worth checking.

Larry
Posted by: athawk11
« on: March 01, 2012, 12:29:21 PM »

I was thinking the same thing, Larry.  My old concave end cap looks pretty good.  I may try to clean up the new cap as Mac had to do.

I may also throw Walcks a line.  That's a good operation.  I bet they would want to know that the drag link kits aren't quite right.

Mac,  I have the new sector shaft sleeves being machined.  I will be able to rebuild the steering box tonight.  My bell crank doesn't have any up and down movement, so just a clean up of the steering box and drag link for me.  Hopefully the Datona 500 is in my little Jeeps' future.

I wonder if I'm going to have to re-adjust my toe in once I'm all back together?

Tim
Posted by: macrisel
« on: March 01, 2012, 10:36:35 AM »

I agree with Larry, use the old caps if you have to.  The rebuild kit I received from Walck's had the same issue, but I was able to clean up the threads and use the new caps.  Make sure the caps go into the drag link and make a snug fit.  Prior to installing the rebuild kit in the drag link and a new bushing in the front arm, my steering wheel would turn almost a 1/4 turn both ways before the front wheels would move.  After the rebuild, the little Jeep is ready for a slalom course!  ;D

Then again, maybe not...........but the steering is nice and tight!  ;)