The CJ3A Page CJ3B.info

Post reply

Warning: this topic has not been posted in for at least 120 days.
Unless you're sure you want to reply, please consider starting a new topic.

Note: this post will not display until it's been approved by a moderator.

Name:
Email:
Subject:
Message icon:

Verification:
Type the letters shown in the picture
Listen to the letters / Request another image

Type the letters shown in the picture:
Write the word between words Jeep from this JeepWILLYSJeep?:
How many slot has a GPW grill?  7 - 9 - 11:

shortcuts: hit alt+s to submit/post or alt+p to preview


Topic Summary

Posted by: rocketeer
« on: June 01, 2011, 05:13:27 PM »

Is that stuff connected directly to the fuel tank? No wonder the old engine blew, it wasn't designed for that hi-test stuff! � :o

Larry
Posted by: Chasm
« on: June 01, 2011, 02:14:45 PM »

The "Heart Transplant" was a success!

The above pictured industrial core with a correct CJ3A front engine plate has replaced my cracked block. All of my components (head, manifolds, etc.) are back on and a Petronix electronic ignition module was added under the distributor cap.

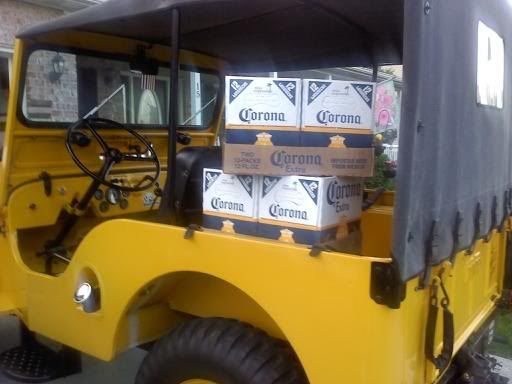
The new L-head runs smooth, clean, and quiet. I decided that I needed to do an additional test drive with a load to see how Old Yeller would handle the weight. Below is a photo at the end of the successful mission... err... test drive! �;)

Posted by: Chasm
« on: May 17, 2011, 03:43:39 PM »

Thanks Mac, but the object of finishing one project is to move on to... and finish the next!  :o I'm still plugging away at my 1983 CJ8 Scrambler Project and a 1946 Bantam trailer too!
Posted by: macrisel
« on: May 17, 2011, 03:34:06 PM »

What fun is having a classic vehicle if you "finish" it and never get to work on it? ;D
Sorry to hear about the misfortune, but I have no doubt Old Yeller will be better than before when you finish.
Posted by: Chasm
« on: May 17, 2011, 02:57:10 PM »

Here are a few more photos for the folks who are interested! �;)

This shows the crack between #2 and #3 that spread into the water jacket. (Yes, I know there is still gasket material on it. The crack came through the gasket too!)


Here are several photos of the "new" L-head. It is extra clean and started right up and ran quiet before it was taken apart for inspection. �:)


I'll post more photos as it all comes back together!
Posted by: Chasm
« on: May 17, 2011, 02:51:24 PM »

Free advice: When you restore an old Jeep, never (never ever) make a comment about how you have finally done everything you can do to your "project." Inevitably, something will come up to cost you more money and take up more time! After all, the Just Empty Every Pocket saying started with a Willys! � >:(

Big problem with coolant getting into the oil. This time it's not a head gasket. The engine in my 3A was a replacement when I got it. It came from a Willys utility vehicle (P/Up, wagon, etc.) based on the serial number, and Bob W's expert opinion. It had a minor crack in the block between the #2 & #3 cylinders. When the L-head was rebuilt, it was worth saving and I had it "pinned" or "knitted" at the machine shop. Well, I guess it had 5 years of playing left in it and I should be happy.

My friend Brad, at Vintage Jeep Specialties in York, PA has a late CJ3A replacement L-head that will soon be in Old Yeller. So, if you see a familiar Willys in York... now you know why. � ;)

For the Jeep history buffs, the photo below is the tag on the donor block. Kaiser Willys made "industrial" blocks for a variety of uses including generators and compressors. Bob W advised me that these blocks were made from the late 1950's into the early 60's and were also sold as replacement engines for CJ2A's and CJ3A's.


In addition to modifying the rear flange, I will have to replace the front engine plate with the correct CJ3A plate in order to get the correct motor mount placement on the frame. (Thanks again Bob!) All of my other engine parts will be placed back onto the donor. The end result will actually be more "correct" than the set-up I was using. �